Adelia Risk reviews Gmail and Calendar security settings in every Google Workspace security audit we perform. Email is still the number one way attackers get into organizations. Phishing, spoofing, business email compromise, malware attachments, data exfiltration through forwarding rules: it all runs through the inbox. Getting your Google Workspace email security right isn’t optional. It’s the difference between catching an attack and explaining a breach to your clients.
The numbers back this up. The FBI’s 2024 IC3 annual report reported $2.77 billion in losses from business email compromise alone. Many started with a spoofed domain, a phishing link that slipped past basic filtering, or a forwarding rule that silently copied every email to an outside address. Google Workspace has strong protections built in, but most of them aren’t on by default. You have to know where to look and what to turn on.
In December 2024, Check Point researchers identified a phishing campaign that hit over 300 organizations using fake Google Calendar invites, sending more than 4,000 phishing emails in just four weeks. The messages bypassed email security filters because they came from legitimate Google Calendar services.
This page covers the 25 Gmail security settings Adelia Risk reviews as part of our Google Workspace security audit services. Use it as a Gmail security checklist for your own environment. It’s part of a 97-setting benchmark across eight security areas. Each setting below includes what it does, why it matters, and what we recommend, with step-by-step guidance on where to find it in the Admin Console. Settings are grouped by security function, and getting your Google Workspace secure email configuration right starts here.
Quick Reference
| Policy ID | Setting | Risk | Heads Up? | Admin Path |
|---|---|---|---|---|
| GMAIL-005 | SPF record published | 🔴 Critical | No | DNS provider |
| GMAIL-010 | DKIM enabled | 🔴 Critical | No | Apps > Gmail > Authenticate email |
| GMAIL-015 | DMARC record published | 🔴 Critical | No | DNS provider |
| GMAIL-020 | DMARC subdomain policy and reporting configured | 🔴 Critical | No | DNS provider (DMARC TXT record) |
| GMAIL-035 | Enhanced pre-delivery message scanning enabled | 🔴 Critical | No | Apps >Gmail > Spam, Phishing and Malware |
| GMAIL-040 | Gmail Enhanced Safe Browsing enabled | 🔴 Critical | No | Apps >Gmail > Spam, Phishing and Malware |
| GMAIL-050 | Gmail Safety email settings turned ON | 🔴 Critical | No | Apps > Gmail > Safety |
| GMAIL-075 | Automatic forwarding disabled | 🔴 Critical | Yes | Apps > Gmail > End-user access |
| GMAIL-125 | DLP rules configured for Gmail (Enterprise SKU only) | 🔴 Critical | Yes | Security > Access and data control > Data protection > Manage Rules |
| GMAIL-025 | MTA-STS configured for inbound mail encryption | 🟠 High | No | DNS \+ hosted policy file |
| GMAIL-045 | Security Sandbox enabled | 🟠 High | No | Apps > Gmail > Spam, Phishing and Malware |
| GMAIL-065 | Email allowlist minimized or empty | 🟠 High | No | Apps > Gmail > Spam, Phishing and Malware > Email allowlist |
| GMAIL-080 | Mail delegation monitored or disabled | 🟠 High | Yes | Apps > Gmail > User Settings > Mail delegation |
| GMAIL-085 | Per-user outbound gateways disabled | 🟠 High | No | Apps > Gmail > End-user access |
| GMAIL-090 | Gmail end user access settings configured | 🟠 High | Yes | Apps> Gmail > End-user access |
| GMAIL-105 | Sensitive data sent via encrypted means only | 🟠 High | Yes | Apps > Gmail > Compliance / Routing |
| CAL-005 | Calendar sharing with external users disabled | 🟠 High | Yes | Apps > Google Workspace > Calendar > Sharing Settings |
| GMAIL-030 | MX records validated | 🟡 Medium | No | DNS provider (guidance: Gmail > Setup) |
| GMAIL-060 | External reply warning enabled | 🟡 Medium | Yes | Apps > Gmail > End User Access |
| GMAIL-070 | Spam filter bypass for internal senders disabled | 🟡 Medium | No | Apps > Gmail > Spam, Phishing and Malware |
| GMAIL-100 | Google Workspace Sync for Outlook configured | 🟡 Medium | Yes | Apps > Gmail > End-user access > Google Workspace Sync |
| GMAIL-110 | Outbound email disclaimer configured | 🟡 Medium | No | Apps >Gmail > Compliance > Append Footer |
| GMAIL-115 | Comprehensive mail storage enabled | 🟡 Medium | No | Apps > Gmail > Compliance > Comprehensive mail storage |
| GMAIL-120 | Gmail Web Offline disabled | 🟡 Medium | Yes | Apps > Gmail > Spam, Phishing, and Malware |
Heads Up? Does your team need advance notice before you make this change? “Yes” means users will see something different. We’ve included sample language you can send to your team for every “Yes” setting.
GMAIL-005: SPF Record Published
What This Does
SPF (Sender Policy Framework) is a DNS record that tells the world which mail servers are allowed to send email on behalf of your domain. When someone receives an email from your company, their mail server checks your SPF record to see if the sending server is on the approved list. If it’s not, the message gets flagged or rejected.
Why It Matters
We check SPF first in every audit because it’s the foundation on which everything else depends. If there’s no SPF record, anyone can send an email that looks like it came from your domain. Attackers do this constantly. They send fake invoices, password reset links, and urgent requests that appear to come from your CEO or your accounting department. Your clients and vendors have no way to tell the difference.
Publishing an SPF record is the first step to authenticating email in Google Workspace. It works alongside DKIM (GMAIL-010) and DMARC (GMAIL-015) to prove your emails are real. Think of it as a guest list for your domain’s email. If a server isn’t on the list, receiving mail systems know something is off.
Relevant to: SEC, HIPAA, and CMMC all require controls against email impersonation.
What We Recommend
- Publish an SPF record that includes Google’s mail servers:
v=spf1 include:_spf.google.com ~all - If you use other services that send email on your behalf (marketing platforms, CRM systems, helpdesk tools), add their SPF includes too
- Use
~all(softfail) while testing, then move to-all(hardfail) once you’ve confirmed all legitimate senders are listed - Check your SPF record with Google’s Check MX tool
Where to Find It
Admin Console path: This is configured in your DNS provider (GoDaddy, Cloudflare, Squarespace Domains, etc.), not in the Admin Console.
📄 Google documentation: Set up SPF to prevent spoofing
What Your Team Will Notice
Nothing. SPF is a behind-the-scenes DNS record. Your team won’t see any change in how they send or receive email.
Common Mistakes
- Including too many DNS lookups. SPF has a limit of 10 DNS lookups. Every
include:statement counts. Organizations that use several third-party senders (Mailchimp, HubSpot, Salesforce, etc.) often exceed this limit without realizing it, which breaks SPF entirely. - Forgetting third-party senders. Your CRM sends invoices. Your marketing tool sends newsletters. Your helpdesk sends ticket updates. If those services aren’t in your SPF record, those emails fail authentication checks.
- Never moving past softfail. A ~all softfail tells receiving servers, “This might be a problem, but don’t block it.” That’s fine for testing, but
-all(hardfail) gives stronger protection once your record is complete.
Related Settings
- GMAIL-010: DKIM Enabled. SPF and DKIM work together. SPF validates the sending server. DKIM validates the message itself.
- GMAIL-015: DMARC Record Published. DMARC ties SPF and DKIM together and tells receivers what to do when checks fail.
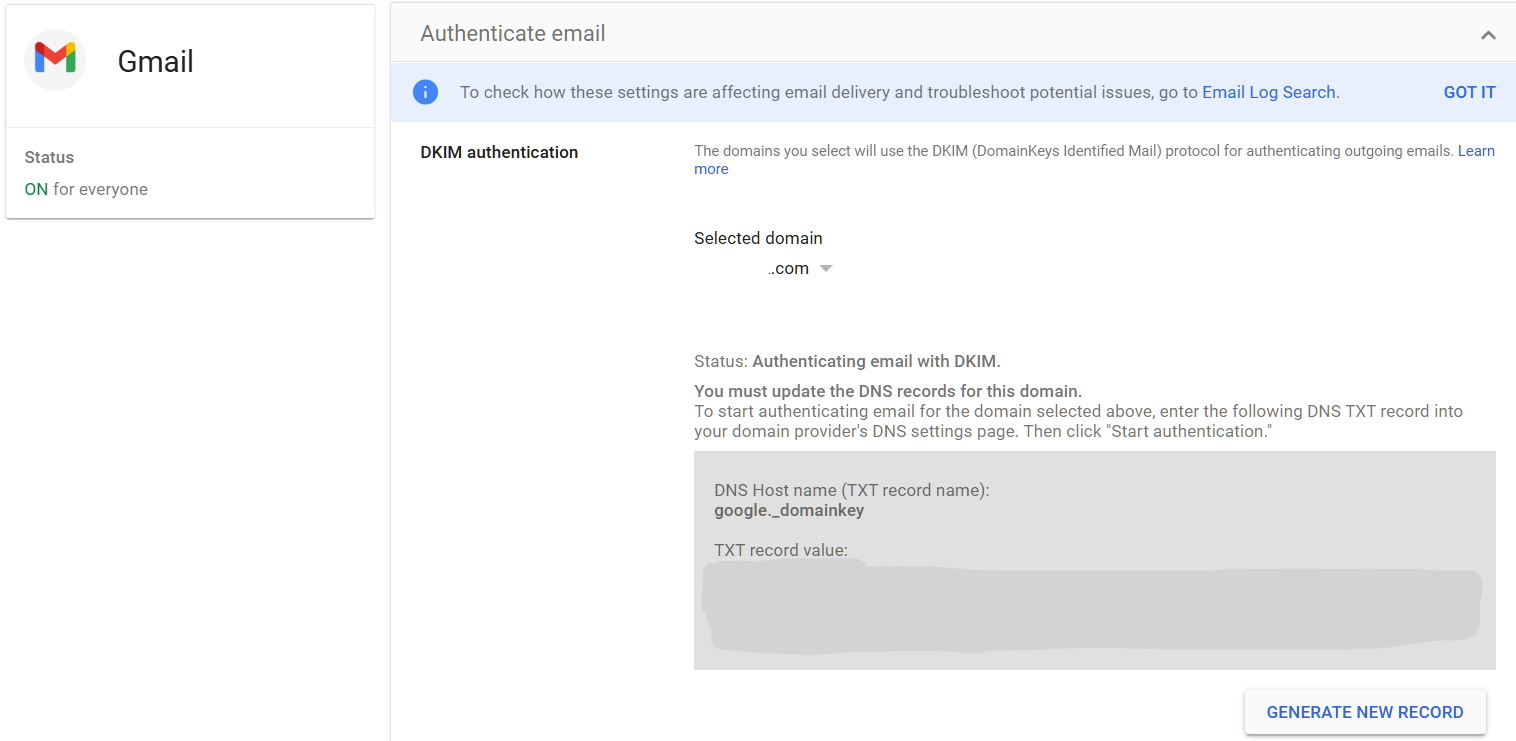
GMAIL-010: DKIM Enabled
What This Does
DKIM (DomainKeys Identified Mail) adds a digital signature to every email your organization sends. The receiving mail server checks this signature against a public key in your DNS records. If the signature matches, the receiver knows the email wasn’t altered in transit and really came from your domain. When you set up DKIM in Google Workspace, Google signs every outgoing message automatically.
Why It Matters
SPF verifies the server. DKIM verifies the message. If DKIM isn’t enabled, an attacker could intercept an email in transit and change its content (swap a bank account number on an invoice, for example) and the recipient would have no way to detect the tampering.
We regularly find organizations that have SPF configured but never turned on DKIM. Google Workspace doesn’t enable DKIM by default. You have to generate a DKIM key in the Admin Console and publish it in your DNS. If you search “setup DKIM Google Workspace,” Google’s own documentation walks you through it. The whole process takes about 10 minutes, but it’s a step many IT providers skip during initial setup.
DKIM is also required for DMARC to work properly. Without it, your DMARC policy has only SPF to rely on, and SPF alone breaks in common scenarios like email forwarding.
Relevant to: CISA SCuBA baselines recommend DKIM for all federal Workspace tenants, and auditors in financial services and healthcare check for it too.
What We Recommend
- Generate a DKIM signing key in the Google Admin Console
- Publish the DKIM TXT record in your DNS
- Use a 2048-bit key (Google’s default and recommended length)
- After publishing, wait 24-48 hours for DNS to propagate, then verify in the Admin Console
- Confirm DKIM is passing by checking email headers or using Google’s Check MX tool
Where to Find It
Admin Console path: Apps > Google Workspace > Gmail > Authenticate email
📄 Google documentation: Turn on DKIM for your domain
What Your Team Will Notice
Nothing. DKIM signing happens automatically on every outgoing message. No user action is needed.
Common Mistakes
- Assuming it’s already on. This is the single biggest mistake we see with Google Workspace email authentication. Google does not enable DKIM by default. You have to generate the key and add a DNS record. Many organizations have been running without DKIM for years and don’t know it.
- Using a 1024-bit key. Some older guides suggest 1024-bit. Always use 2048-bit for stronger security. If your DNS provider doesn’t support long TXT records, you may need to split the key across two strings.
- Forgetting to verify after publishing. Adding the DNS record isn’t the last step. Go back to the Admin Console and click “Start authentication” to activate DKIM signing.
Related Settings
- GMAIL-005: SPF Record Published. SPF and DKIM are both needed for DMARC to work.
- GMAIL-015: DMARC Record Published. DMARC uses DKIM results to make policy decisions.
- GMAIL-020: DMARC Subdomain Policy and Reporting. Reporting helps you confirm DKIM is passing.
GMAIL-015: DMARC Record Published
What This Does
DMARC (Domain-based Message Authentication, Reporting, and Conformance) is the policy layer that sits on top of SPF and DKIM. It tells receiving mail servers what to do when an email from your domain fails SPF and DKIM checks: let it through, quarantine it, or reject it outright. DMARC also sends you reports showing who is sending email using your domain, including attackers trying to impersonate you.
Why It Matters
SPF and DKIM can detect fakes, but DMARC is what tells the receiving server to actually block them. Setting up a DMARC policy that Google Workspace admins can enforce puts you in control. With a DMARC policy set to reject, receiving servers will block emails that fail authentication. Your domain becomes much harder to impersonate.
BEC attacks cause billions in annual losses, and a significant portion relies on domain spoofing, which is exactly what DMARC prevents.
Relevant to: CISA’s Binding Operational Directive 18-01 required all federal agencies to implement DMARC at p=reject. Financial regulators and healthcare auditors check for DMARC as part of email security assessments.
What We Recommend
- Publish a DMARC record starting with
p=noneto collect reports without affecting mail delivery - Review DMARC reports for 2-4 weeks to identify all legitimate senders
- Move to
p=quarantineonce you’re confident your SPF and DKIM are correct - Move to
p=rejectas the final step, which blocks all unauthorized email from your domain - Include a reporting address:
rua=mailto:dmarc-reports@yourdomain.com
Where to Find It
Admin Console path: This is a DNS TXT record, not an Admin Console setting. Google provides guidance at: Apps > Google Workspace > Gmail > Authenticate email. If you need help, Google’s documentation on how to set up DMARC for Google Workspace admin help pages walks through each step.
📄 Google documentation: Set up DMARC to prevent spoofing
What Your Team Will Notice
Nothing at p=none. At p=quarantine, Some emails from misconfigured third-party senders might land in spam. At p=reject, those emails won’t be delivered at all. This only affects services sending email on your behalf that aren’t properly authenticated, not your team’s regular email.
Common Mistakes
- Jumping straight to
p=reject. If your SPF or DKIM records are incomplete, a reject policy will block legitimate email from services like your CRM or marketing platform. Always start atp=noneand review reports first. - Setting
p=noneand never moving forward. We see this constantly. Organizations publish a DMARC recordp=noneduring setup and then never progress toquarantineorreject. Anonethe policy collects data but doesn’t block anything. You get reports, but attackers can still impersonate your domain. - Ignoring the reports. DMARC sends XML reports to the email address you specify. These reports show every server that sent email using your domain. Without reading them, you can’t safely move to a stricter policy.
Related Settings
- GMAIL-005: SPF Record Published. DMARC checks SPF alignment.
- GMAIL-010: DKIM Enabled. DMARC checks DKIM alignment.
- GMAIL-020: DMARC Subdomain Policy and Reporting. Extends your DMARC policy to subdomains and configures reporting.
GMAIL-020: DMARC Subdomain Policy and Reporting Configured
What This Does
Your main DMARC record covers your primary domain (e.g., yourcompany.com). But attackers can also spoof subdomains you’ve never even created, like hr.yourcompany.com or billing.yourcompany.com. The subdomain policy tag (sp=) in your DMARC record controls what happens to email from those subdomains. Reporting tags (rua= and ruf=) control where DMARC reports get sent.
Why It Matters
Most organizations set a DMARC policy for their main domain and forget about subdomains. Attackers know this. If your main domain has p=reject but no subdomain policy, they’ll send phishing emails from payroll.yourcompany.com or support.yourcompany.com. Recipients see your domain name and trust the message.
DMARC reporting is equally important. Without it, you’re flying blind. Reports tell you which servers are sending email as your domain (both legitimate and malicious), whether SPF and DKIM are passing, and where problems exist. CISA’s SCuBA baseline specifically requires both a subdomain policy and an active reporting address.
Relevant to: CISA SCuBA requires sp=reject and active DMARC reporting for Google Workspace tenants.
What We Recommend
- Set the subdomain policy to match your main domain policy:
sp=reject(orsp=quarantinewhile transitioning) - Configure aggregate reporting:
rua=mailto:dmarc-reports@yourdomain.com - Consider a DMARC report processing service (like Valimail, dmarcian, or Postmark) to turn raw XML reports into readable dashboards
- Review reports monthly at minimum
Where to Find It
Admin Console path: This is configured in your DNS provider as part of your DMARC TXT record, not in the Admin Console.
Example record with subdomain policy and reporting: v=DMARC1; p=reject; sp=reject; rua=mailto:dmarc@yourdomain.com; ruf=mailto:dmarc-forensic@yourdomain.com
📄 Google documentation: Set up DMARC to prevent spoofing
What Your Team Will Notice
Nothing. This is a DNS record change that affects how receiving servers handle email from your subdomains. Your team won’t see any difference.
Common Mistakes
- No subdomain policy at all. If you leave out
sp=, subdomains inherit the main domain policy. That’s fine if your main policy isreject. But if your main policy is stillnoneorquarantine, subdomains are unprotected or only partially protected. - No reporting address. Without
rua=, you get zero visibility into who is using your domain. You can’t tell if a third-party service is failing authentication or if attackers are spoofing you. - Sending reports to an inbox no one checks. A
dmarc-reports@address that fills up and gets ignored is barely better than no reporting. Use a DMARC report processing tool or assign someone to review the data.
Related Settings
- GMAIL-015: DMARC Record Published. The parent DMARC policy that this extends.
- GMAIL-005: SPF Record Published. SPF alignment is one of the two checks DMARC evaluates.
- GMAIL-010: DKIM Enabled. DKIM alignment is the other check.
GMAIL-025: MTA-STS Configured for Inbound Mail Encryption
What This Does
When another mail server sends email to your domain, it should use an encrypted connection. MTA-STS (Mail Transfer Agent Strict Transport Security) makes that a requirement, not a suggestion. By default, email encryption between servers is “opportunistic,” which means servers try to encrypt but fall back to plain text if encryption fails. MTA-STS removes that fallback. If encryption can’t be established, the email doesn’t get delivered.
Why It Matters
Most people assume email is encrypted. And it usually is, at least in transit between major providers. But “usually” isn’t good enough. When MTA-STS isn’t configured, an attacker positioned between two mail servers can perform a downgrade attack, tricking the servers into thinking encryption isn’t available and forcing the email to transmit in plain text. The attacker then reads everything.
This matters most for organizations that send sensitive information by email: financial statements, protected health information, legal documents, or client data. MTA-STS closes the gap between “encryption is attempted” and “encryption is required.”
Relevant to: HIPAA, SEC, and CMMC all require encryption of sensitive data in transit.
What We Recommend
- Publish an MTA-STS policy file at
https://mta-sts.yourdomain.com/.well-known/mta-sts.txt - Start in
testingmode to identify delivery issues before enforcing - Publish a TLS-RPT DNS record (
_smtp._tls.yourdomain.com) to receive reports on TLS failures - Move to
enforcemode once you’ve confirmed no delivery problems - The policy file must be served over HTTPS with a valid certificate
Where to Find It
Admin Console path: This is configured through DNS records and a web-hosted policy file, not in the Admin Console. Google provides information under Gmail security settings.
📄 Google documentation: Enhance email security with MTA-STS and TLS reporting
What Your Team Will Notice
Nothing. MTA-STS works between mail servers, not at the user level. Your team sends and receives email the same way they always have.
Common Mistakes
- Skipping it because it’s “too technical.” MTA-STS requires a DNS record and a hosted text file. It’s not as simple as flipping a switch, but it’s not a massive project either. Most IT providers can set it up in under an hour.
- Forgetting to renew the HTTPS certificate. The MTA-STS policy file must be served over HTTPS. If the certificate expires, the policy can’t be fetched and email delivery may be affected.
- Staying in testing mode permanently. Testing mode sends reports but doesn’t enforce encryption. It’s useful for a few weeks, not forever. Move to
enforceonce everything looks clean.
Related Settings
- GMAIL-030: MX Records Validated. MTA-STS references your MX records. They need to match.
- GMAIL-005: SPF Record Published. Part of the broader email authentication and infrastructure stack.
GMAIL-030: MX Records Validated
What This Does
Your MX records tell the internet where to deliver email for your domain. MX stands for Mail Exchange, and for Google Workspace, these records should point to Google’s mail servers. If they point somewhere else, or if they’re misconfigured, email may not reach your team at all, or it could be routed through a third-party server first.
Why It Matters
Incorrect MX records can cause email delivery failures, which is the obvious problem. But the security risk is subtler. If your MX records point to an old or unauthorized server, email meant for your organization could be going somewhere you don’t control. An attacker who gains access to your DNS could redirect your email by changing MX records, intercepting every message your company receives.
Google’s Security Health page flags this because it’s a foundational setting that, if wrong, breaks everything else. SPF, DKIM, DMARC, and MTA-STS all depend on email actually arriving at the right servers.
What We Recommend
- Verify your MX records point to Google’s mail servers (the standard five Google MX records with correct priorities)
- Remove any legacy MX records from old email providers
- Run a check with Google’s Check MX tool at least annually
- If you use an email filtering gateway (like Barracuda or Mimecast), your MX records will point there instead of directly to Google, and that’s expected. Just make sure the configuration is intentional and documented.
Where to Find It
Admin Console path: This is configured in your DNS provider. Google provides guidance at: Apps > Google Workspace > Gmail > Setup
📄 Google documentation: Set up MX records for Google Workspace email
What Your Team Will Notice
Nothing, unless the records are wrong. If MX records are misconfigured, the symptom is email that doesn’t arrive. Fixing them resolves delivery issues silently.
Common Mistakes
- Leftover MX records from a previous email provider. We’ve seen a few cases where old MX records from a previous provider caused split delivery for months before anyone noticed. When companies migrate to Google Workspace, old MX records sometimes stay in DNS, and some emails go to the old system instead of Google.
- Wrong priority values. MX records have priority numbers. Lower numbers get tried first. If priorities are wrong, email might route to a backup server that’s not configured to handle your mail.
- Not checking after DNS provider changes. If you switch DNS providers or registrars, MX records sometimes don’t transfer correctly. Always verify after a migration. As part of our Virtual CISO service, we monitor for unauthorized changes to your DNS records.
Related Settings
- GMAIL-025: MTA-STS Configured. MTA-STS references your MX hostnames. They must match.
- GMAIL-005: SPF Record Published. Another DNS-based email setting that needs periodic verification.
GMAIL-035: Enhanced Pre-Delivery Message Scanning Enabled
What This Does
Enhanced pre-delivery message scanning tells Google to take extra time analyzing suspicious emails before delivering them to a user’s inbox. When Gmail detects a message that might be phishing, it holds the email briefly and runs deeper checks on links and attachments. It uses machine learning to decide if the message is safe. If the message is dangerous, Gmail blocks it before the user ever sees it.
Why It Matters
Standard Gmail filtering catches a lot. But attackers are smart. They use brand-new phishing URLs that haven’t been flagged yet, time-delayed redirects that send you to a clean page first and a malicious page later, and attachments that only activate after delivery. Enhanced pre-delivery scanning catches threats that slip past the initial filter by running deeper analysis before the message hits the inbox.
This is one of the strongest Google Workspace phishing protection features available, and it’s included in all Google Workspace editions. There’s no extra cost. The only tradeoff is a brief delay (seconds, not minutes) on flagged messages.
Relevant to: SEC and HIPAA both require email-borne threat protection. This is one of the most effective Gmail security settings available.
What We Recommend
- Turn this ON for all organizational units
- There are no sub-settings to configure. It’s a single toggle.
- Leave it on permanently. There’s no business reason to disable it.
Where to Find It
Admin Console path: Apps > Google Workspace > Gmail > Spam, Phishing and Malware
📄 Google documentation: Enhanced pre-delivery message scanning

What Your Team Will Notice
Nothing noticeable. Some suspicious emails may arrive a few seconds later than usual while Google runs extra checks. Users won’t see a notification about the delay. They’ll just get fewer phishing emails in their inbox.
Common Mistakes
- Not turning it on because you didn’t know it existed. This setting is buried in the Spam, Phishing and Malware section. It’s not on by default in all configurations. Check it.
- Assuming standard filtering is enough. Standard Gmail filtering is good, but attackers specifically design campaigns to bypass it. Enhanced scanning adds a second layer that catches what the first layer misses.
Related Settings
- GMAIL-040: Gmail Enhanced Safe Browsing. Additional protections that work alongside pre-delivery scanning.
- GMAIL-045: Security Sandbox. Detonates suspicious attachments in a safe environment.
- GMAIL-050: Gmail Safety Settings. The broader safety settings umbrella that includes phishing protections.
GMAIL-040: Gmail Enhanced Safe Browsing Enabled
What This Does
Gmail Enhanced Safe Browsing performs additional checks on incoming messages for harmful content before delivering them to recipients. It scans for malware, phishing attempts, and dangerous links in the background, giving Gmail more data to work with when deciding whether a message is safe. Admins control this setting organization-wide; end users can view the setting but cannot toggle it themselves.
Why It Matters
Standard Gmail filtering catches a lot, but Enhanced Safe Browsing adds a proactive layer that goes further. When enabled, Google associates browsing and email activity information with user accounts to improve detection of malware and phishing campaigns targeting your organization specifically. That additional context helps Gmail spot threats that generic scanning would miss.
This setting is turned off by default. That means every Google Workspace tenant starts with this protection disabled unless an admin explicitly enables it. In most audits we run, this is still off simply because the admin team didn’t know it existed.
Some important caveats: if you use client-side encryption (CSE), Enhanced Safe Browsing cannot scan that encrypted content. CSE encrypts Workspace data in a way that Google’s servers cannot read, so Gmail Enhanced Safe Browsing has no visibility into CSE-protected messages. If your organization uses CSE, you’ll need to weigh the tradeoff between encryption privacy and this additional scanning layer.
Enabling Enhanced malware and phishing protection requires sharing real-time user activity with Google. By turning this on, Enhanced Safe Browsing data is temporarily associated with individual Google Workspace accounts to improve threat detection. Admins should be aware that this provides Google with more granular visibility into user activity across the organization.
Relevant to: HIPAA, SEC, and CMMC all require protections against email-borne threats. Enabling Enhanced Safe Browsing is a baseline step toward meeting those requirements.
What We Recommend
- Enable Gmail Enhanced Safe Browsing for your entire organization
- Apply the setting at the top-level organizational unit so all users are covered by default
- If you need to exclude specific OUs or groups (rare), document the business justification
- Verify that CSE is not enabled on the same users, since CSE prevents Enhanced Safe Browsing from scanning message content
- Check this setting quarterly. Admin console changes or org restructuring can reset it.
Where to Find It
Admin Console path: Apps > Google Workspace > Gmail > Spam, Phishing and Malware
📄 Google documentation: Turn Gmail Enhanced Safe Browsing on or off

What Your Team Will Notice
Nothing visible. Enhanced Safe Browsing works entirely in the background. Users won’t see new warnings or banners. Messages that would have been delivered before may now be flagged or moved to spam if they contain harmful content that standard scanning missed. The only scenario where a user might notice a difference is if a borderline message that previously landed in their inbox now goes to spam.
Common Mistakes
- Assuming it’s already on. It’s off by default. If you haven’t explicitly enabled it, it’s not protecting your users.
- Enabling it alongside client-side encryption without understanding the conflict. CSE and Enhanced Safe Browsing are mutually exclusive for the same content. If CSE is on, Gmail cannot perform enhanced scanning on those messages. Know which users have CSE enabled and plan accordingly.
- Forgetting to check after org restructuring. If you reorganize your OUs, inherited settings can change. An OU that previously inherited Enhanced Safe Browsing from the parent might lose the setting if it gets moved.
Related Settings
- GMAIL-035: Enhanced Pre-Delivery Message Scanning. Pre-delivery scanning and malware features overlap. Both should be on.
- GMAIL-045: Security Sandbox. Opens suspicious attachments in a sandbox before delivering them.
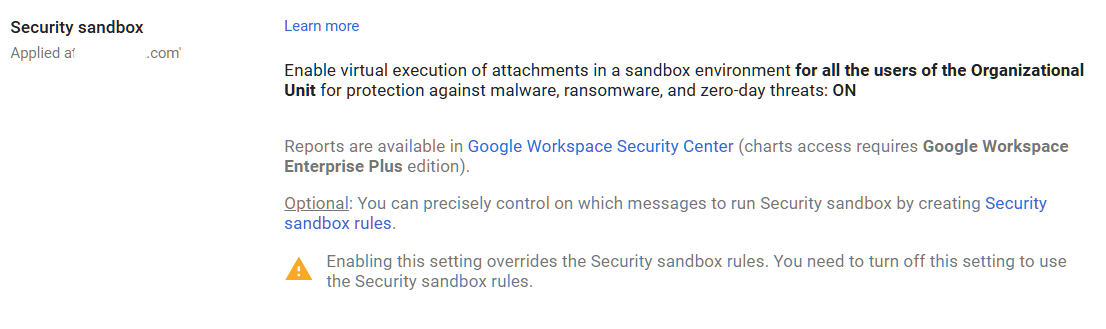
GMAIL-045: Security Sandbox Enabled
What This Does
Gmail Security Sandbox opens suspicious email attachments in a virtual environment (a “sandbox”) before delivering them to the recipient. The sandbox runs the attachment, watches what it does, and checks for malicious behavior like attempts to download additional malware, modify system files, or connect to command-and-control servers. If the attachment acts malicious, Gmail blocks it. If it’s clean, the email gets delivered normally.
Why It Matters
Traditional antivirus scans attachments by matching them against known malware signatures. That works for known threats. But it misses new malware (called “zero-day” threats because there’s been zero days to create a signature for them). The Gmail Security Sandbox takes a different approach: instead of asking “have we seen this before?” it asks “what does this file actually do?”
We see this catch threats that other filtering misses, particularly targeted attacks against specific organizations. A phishing email with a custom-built Excel file containing malicious code won’t match any signature database. But when the sandbox opens it and the file tries to download a remote payload, the sandbox flags it immediately.
Relevant to: Recommended by CISA SCuBA for Google Workspace tenants. Addresses HIPAA and SEC requirements for malware defense.
What We Recommend
- Enable Security Sandbox for all organizational units
- Set the sandbox to apply to all attachment types (not just specific file types)
- If your edition supports it, enable sandbox rules that quarantine flagged messages
- Don’t create bypass rules. Only add one if you have a documented reason that justifies the risk
Where to Find It
Admin Console path: Apps > Google Workspace > Gmail > Spam, Phishing and Malware
📄 Google documentation: Set up rules to detect harmful attachments
Note: Security Sandbox is available on Frontline Plus, Business Standard, Business Plus, Enterprise Standard, Enterprise Plus, Education Standard, and Education Plus editions. Business Starter is the main edition where it’s not available.
What Your Team Will Notice
Emails with attachments may arrive with a very slight delay (usually under a minute) while the sandbox analyzes them. Users won’t see a notification about the scanning. If an attachment is flagged, the user will see the email in their spam folder or the email will be quarantined, depending on your configuration.
Common Mistakes
- Not enabling it even though your edition includes it. Security Sandbox is available on most Workspace editions (Business Standard and above). If it’s available on your plan and you haven’t turned it on, you’re missing protection you’re already paying for.
- Setting the sandbox to only scan specific file types. Attackers change file types and formats constantly. Scan everything.
- Creating exemptions for automated emails. Automated invoice emails, shipping notifications, and similar messages are exactly the formats attackers impersonate. Don’t exempt them.
Related Settings
- GMAIL-035: Enhanced Pre-Delivery Message Scanning. Works alongside the sandbox to catch phishing before delivery.
- GMAIL-040: Gmail Enhanced Safe Browsing. Handles encrypted attachments and shortened URLs that the sandbox complements.
GMAIL-050: Gmail Safety Email Settings Turned ON
What This Does
Gmail Safety settings control a collection of protections that flag or block suspicious emails based on content patterns. These include warnings when users try to click links in suspicious emails, automatic moving of suspected phishing to spam, and warnings about emails from senders who aren’t authenticated. When these settings are ON, Gmail actively warns users before they interact with risky messages.
Why It Matters
Even with pre-delivery scanning and sandbox analysis, some borderline emails will reach your team’s inboxes. Safety settings act as the last line of defense. They add warning banners to suspicious messages and block click-throughs on known phishing links. The most obvious threats get moved straight to spam.
In most audits we run, at least one or two of these sub-settings are turned OFF. Sometimes an admin disabled one years ago to troubleshoot a delivery issue and never turned it back on. Sometimes the settings were never fully enabled during initial Workspace setup. Each one that’s off is a gap in your Google Workspace phishing protection and email security.
Relevant to: HIPAA, SEC, and CMMC all require protections against email-based threats. These settings are baseline requirements, not optional extras.
What We Recommend
- Turn all Safety settings to ON
- Don’t leave any sub-setting in “Warning” mode if “Move to spam” is available
- Apply settings to all organizational units
- Review these quarterly to confirm nothing was accidentally changed
Where to Find It
Admin Console path: Apps > Google Workspace > Gmail > Safety
📄 Google documentation: Gmail Safety settings
What Your Team Will Notice
Users may see more warning banners on emails from senders with authentication problems. Some emails that previously landed in the inbox might move to spam. If a legitimate sender is affected, the fix is to have that sender fix their email authentication (SPF, DKIM, DMARC), not to weaken your safety settings.
Common Mistakes
- Turning settings to “Warning” instead of the strongest available option. Warnings are easy to dismiss. If Gmail is confident enough to flag a message, use the strongest enforcement option available.
- Disabling a sub-setting to fix a delivery problem and forgetting to re-enable it. We see this in every third audit. Someone turned off a safety setting months ago to troubleshoot a specific issue. The issue got resolved, but the setting stayed off.
- Not checking all the sub-settings. The Safety page has multiple toggles. It’s easy to enable the top one and miss the others. Click into each sub-setting and verify it’s configured.
Related Settings
- GMAIL-035: Enhanced Pre-Delivery Message Scanning. Works upstream of Safety settings to catch threats before delivery.
GMAIL-060: External Reply Warning Enabled
What This Does
When this setting is enabled, Gmail displays a warning banner when a user tries to reply to or compose an email to someone outside your organization. The warning says something like “Be careful with this message. The sender isn’t in your contacts or organization.” It gives users a moment to pause and confirm they’re sending to the right person.
Why It Matters
Many data breaches start with a simple mistake: an employee replies to what they think is an internal email, but the sender is actually external. Or someone forwards a sensitive document to the wrong person because the display name matched an internal contact. The external reply warning creates a speed bump, just enough friction to make people stop and look at the actual email address before responding.
This won’t stop a determined attacker, and it won’t prevent every mistake. But it raises awareness and catches the most common error: replying to a spoofed or look-alike email without checking the sender’s address.
Relevant to: SEC and HIPAA both expect controls that reduce accidental data disclosure.
What We Recommend
- Enable the external reply warning for all users
- This is a simple toggle with no sub-settings to configure
Where to Find It
Admin Console path: Apps > Google Workspace > Gmail > End User Access
📄 Google documentation: Configure email warnings for external recipients

What Your Team Will Notice
Users will see a yellow warning banner when they reply to or compose emails to external addresses. This shows up every time, not just for suspicious messages. Some users find it helpful. Others find it annoying at first but get used to it within a week or two.
Sample message to your team:
Hi team,
Starting \[date\], Gmail will show a yellow warning banner when you reply to or write an email to someone outside our organization. This is a normal safety feature, not a sign that anything is wrong with the email.
What to do when you see the warning:
- Glance at the recipient’s email address to make sure it’s who you expect
- If everything looks right, send the email as normal
The warning is there to catch moments when an email looks internal but is actually from someone outside the company. It takes a split second to check, and it can prevent accidental data sharing. If you have questions, reach out to \[IT contact/helpdesk\].
Common Mistakes
- Disabling it after users complain. Yes, it’s one more thing on screen. But it costs nothing and catches real mistakes. Give it two weeks before considering any changes.
- Thinking this replaces authentication-based protections. The external reply warning is a user-facing nudge, not a technical control. It doesn’t stop phishing emails from arriving. It just helps users notice when they’re talking to someone outside the organization.
Related Settings
- GMAIL-050: Gmail Safety Settings. Part of the same Safety settings group.
GMAIL-065: Email Allowlist Minimized or Empty
What This Does
Gmail’s email allowlist (sometimes called a whitelist) lets admins specify IP addresses or domains that bypass spam filtering. If you’ve seen instructions for how to Gmail whitelist domain senders, this is the setting those guides refer to. Any email from an allowlisted source goes straight to the inbox, skipping Google’s phishing detection, spam filters, and safety checks. The allowlist was originally designed for legitimate use cases like ensuring mail from a specific partner or internal system always gets delivered.
Why It Matters
Every entry on your allowlist is a hole in your spam and phishing protection. If you’ve ever searched for how to Gmail whitelist domain entries, you’ve probably seen advice about adding trusted senders. The problem is that every allowlisted domain bypasses all of your filters. If an attacker compromises a server at an allowlisted IP, or if an allowlisted domain gets spoofed, malicious emails flow directly into your inboxes with zero filtering. Google’s own Security Health page flags non-empty allowlists as a risk.
Adelia Risk regularly finds allowlists with entries added years ago for reasons no one remembers. An old marketing platform. A former IT provider’s relay server. A test entry that was never removed. Each one bypasses the Google Workspace spam filter settings you’ve carefully configured.
Relevant to: CISA SCuBA recommends empty allowlists. Financial and healthcare auditors check for allowlist entries as part of email security reviews.
What We Recommend
- Review your current allowlist and document why each entry exists
- Remove any entry that doesn’t have a clear, current business need
- If you must allowlist an IP, limit it to the narrowest possible range
- Never allowlist entire domains. An allowlisted domain means any compromised account at that domain bypasses your filters.
- Check the allowlist quarterly
Where to Find It
Admin Console path: Apps > Google Workspace > Gmail > Spam, Phishing and Malware > Email allowlist
📄 Google documentation: Allowlist email from specific IP addresses

What Your Team Will Notice
Nothing, for most people. If a previously allowlisted sender starts getting filtered, someone may report that emails from a specific sender are now going to spam. Investigate the sender’s email authentication. Fix the root cause (their SPF/DKIM/DMARC) instead of re-adding them to the allowlist.
Common Mistakes
- Adding entries as a quick fix for delivery problems. When someone reports that emails from a vendor aren’t arriving, the fastest fix is to allowlist them. But the real fix is to have that vendor set up proper email authentication. Allowlisting hides the problem and creates a security gap.
- Allowlisting an entire domain. Allowlisting
partnerdomain.commeans that if any user at that domain gets compromised, phishing emails from their account bypass all your filters. - Never auditing the list. Allowlists grow over time and rarely shrink. Set a calendar reminder to review yours every quarter.
Related Settings
- GMAIL-070: Spam Filter Bypass for Internal Senders. Another setting that can weaken spam filtering.
- GMAIL-050: Gmail Safety Settings. Allowlist entries bypass these safety protections.
GMAIL-070: Spam Filter Bypass for Internal Senders Disabled
What This Does
Google Workspace has a setting that lets email from internal senders (users within your organization) bypass spam filters. When this is enabled, any email sent from an address in your domain skips Gmail’s spam and phishing checks. The idea was to prevent internal emails from being accidentally filtered. In practice, it creates a blind spot.
Why It Matters
If an attacker compromises one of your user accounts, they can use that account to send phishing emails to everyone else in the organization. With the spam bypass enabled, those internal phishing emails skip every filter Google has. No pre-delivery scanning. No safety warnings. No sandbox analysis. The malicious email goes straight to inboxes.
Account compromise isn’t hypothetical. It’s one of the first things attackers do after stealing credentials. They log in, search for financial contacts and sensitive threads, and then send targeted phishing from the compromised account to other employees. If your internal spam bypass is on, those emails are invisible to Gmail’s protection.
Relevant to: This setting is flagged by Google’s Security Health page and aligns with CISA SCuBA recommendations for Gmail security.
What We Recommend
- Disable the internal sender spam filter bypass
- There’s no good reason to exempt internal email from spam filtering
- If internal emails are landing in spam after disabling this, it usually means an internal system (like a shared mailbox or automated notification) has authentication problems. Fix those problems instead of bypassing the filter.
Where to Find It
Admin Console path: Apps > Google Workspace > Gmail > Spam, Phishing and Malware > Spam (look for the “Bypass spam filters for messages received from internal senders” checkbox)
📄 Google documentation: Configure inbound mail gateway
What Your Team Will Notice
Nothing in most cases. Internal emails between users are almost never flagged as spam. If an internal automated system (like a form notification or CRM-generated email) starts getting filtered, it means that system’s email authentication needs fixing.
Common Mistakes
- Enabling the bypass to solve an internal delivery issue. When internal automated emails go to spam, the temptation is to bypass the filter for all internal senders. That fixes the symptom but opens a much bigger hole. Fix the specific sending issue instead.
- Not knowing this setting exists. It’s buried in the inbound gateway or spam configuration. Many admins have never looked at it, and the default may vary depending on when your Workspace account was created.
Related Settings
- GMAIL-065: Email Allowlist Minimized. Another setting that creates filter bypasses. Both should be locked down.
- GMAIL-050: Gmail Safety Settings. Spam bypass can override safety protections on internal messages.
- AUTH-005: Two-Step Verification Enforcement. Strong MFA reduces the risk of account compromise that makes this bypass dangerous.
GMAIL-075: Automatic Forwarding Disabled
What This Does
Google Workspace lets users set up automatic email forwarding, which sends a copy of every incoming message to another email address. This setting controls if users can create those forwarding rules on their own or if it’s blocked at the admin level.
Why It Matters
Automatic forwarding is one of the first things an attacker sets up after compromising a mailbox. They add a forwarding rule to an external address, and from that point on, they get a copy of every email the victim receives. The victim doesn’t notice anything different. No missing emails, no strange behavior. The attacker just silently collects everything.
This is a classic move in business email compromise (BEC). In many of these cases, the attacker had been quietly reading forwarded emails for weeks before making their move, learning the company’s billing process and who approves payments.
Adelia Risk flags this in every audit because we regularly find this setting left open. Most employees don’t need automatic forwarding, and the ones who think they do usually have a better option available (like a shared mailbox or delegation for specific needs).
Relevant to: SEC, HIPAA, and CMMC compliance frameworks all flag uncontrolled email forwarding as a data exfiltration risk.
What We Recommend
- Disable automatic forwarding for all users at the organizational level
- Check existing forwarding rules before turning it off. Go to Reporting > Email log search and look for forwarding activity so you don’t break a workflow someone depends on
- If specific users need forwarding for a business reason, create a separate OU (organizational unit) with forwarding allowed and move only those users into it
- Migrate business-needed forwarding rules to the admin console: You can configure ‘Email forwarding using recipient address map’ to maintain forwarding rules but controlled by a limited number of admins
Where to Find It
Admin Console path: Apps > Google Workspace > Gmail > End-user access
📄 Google documentation: Disable automatic email forwarding, Redirect or forward Gmail messages to another user

What Your Team Will Notice
Nothing, as long as nobody currently has auto-forwarding set up. If someone does, their forwarding rules stop working. Users who try to set up forwarding in their Gmail settings won’t see the option.
If someone was relying on forwarding to feed a CRM, ticketing system, or personal inbox, they’ll need an alternative. Talk to your team before flipping this switch if you’re not sure anyone is using it.
Common Mistakes
- Not checking for existing forwarding rules first. Turning this off breaks any active auto-forwards. Check the email logs first so you don’t disrupt a workflow.
- Assuming “nobody would set that up.” In almost every audit we run, at least one user has auto-forwarding configured to a personal Gmail account. Sometimes it’s innocent, sometimes it isn’t.
- Leaving it on “to be safe.” The safe choice is the opposite. Forwarding creates a silent copy of your email stream that goes to an address you may not control.
Related Settings
- GMAIL-080: Mail Delegation. Another way users can share mailbox access.
- GMAIL-090: End User Access Settings. Controls IMAP, POP, and other Gmail sync settings.
- MON-005: Google Audit Logs. Monitor for unauthorized forwarding rules.
GMAIL-080: Mail Delegation Monitored or Disabled
What This Does
Mail delegation lets a user grant another person access to read, send, and manage email on their behalf. It’s like giving someone a key to your mailbox. The delegate can read incoming messages, reply as the account owner, and delete emails.
Why It Matters
Delegation is useful when an executive has an assistant who manages their inbox, or when a team shares a role-based address. But it’s a risk when it’s unmonitored. A compromised account with delegation to other mailboxes gives the attacker access to multiple inboxes at once.
We see delegation left enabled in most Google Workspace environments, and nobody is tracking who has delegated access to whom. That means if one account is compromised, the blast radius could be much wider than you’d expect.
The bigger concern is social engineering. An attacker who controls one account can add delegation to another account silently. Without monitoring, this goes undetected.
Relevant to: HIPAA requires access controls on email containing protected health information (PHI). SEC expects firms to track who has access to client communications.
What We Recommend
- If your organization doesn’t use delegation: Disable it entirely
- If delegation is needed (executive assistants, shared inboxes):
- Keep it enabled but audit who has delegated access quarterly
- Set up an alert rule to notify admins when new delegation is added
- Document which delegations are approved and review the list regularly
Where to Find It
Admin Console path: Apps > Google Workspace > Gmail > User Settings > Mail delegation
📄 Google documentation: Turn mail delegation on or off

What Your Team Will Notice
If you disable delegation, anyone currently relying on it loses access to the delegated mailbox. Assistants who manage an executive’s inbox would need to switch to a shared mailbox or Google Groups.
If you keep it enabled but add monitoring, nobody notices any difference in their daily routine.
Sample message to your team:
Hi team,
Starting \[date\], we’re updating how email delegation works. If you currently have someone managing your inbox through delegation (an assistant reading or replying on your behalf), please let \[IT contact/helpdesk\] know by \[date\] so we can make sure that access continues without interruption.
If you don’t use email delegation, you won’t notice any changes.
Common Mistakes
- Forgetting about delegation when offboarding employees. A former employee’s delegation access doesn’t automatically go away when their account is suspended. Check delegated access as part of your offboarding process.
- Using delegation instead of shared mailboxes. For team email addresses (info@, support@), a Google Group or shared mailbox is a better fit than delegation. Delegation ties access to one person’s account.
Related Settings
- GMAIL-075: Automatic Forwarding. Forwarding is another way email leaves a user’s mailbox.
- ADMIN-040: Inactive Accounts. Inactive accounts with delegation still grant access.
- MON-010: Email Notification Rules. Set up alerts for new delegation.
GMAIL-085: Per-User Outbound Gateways Disabled
What This Does
Google Workspace includes a setting that lets individual users route their outbound email through an external mail server instead of Google’s servers. This is called a “per-user outbound gateway.” When enabled, a user can configure their own SMTP server to send emails that look like they’re coming from your domain.
Why It Matters
There is almost no legitimate business reason for an end user to route their outbound mail through a non-Google server. But an attacker who compromises an account loves this feature. They can route email through a server they control, bypassing your Google Workspace email security controls, DLP rules, and audit logging.
Think of it this way: your email security settings check messages as they leave through Google’s servers. If someone reroutes mail through a different server, those checks don’t happen. Your DKIM signing, encryption enforcement, and DLP rules all get skipped.
This is one of those Gmail advanced settings that most admins don’t even know exists, which is exactly why CISA calls it out.
What We Recommend
- Disable per-user outbound gateways. There’s no reason for end users to have this ability
- If your organization uses a third-party mail gateway (like Proofpoint or Mimecast) at the admin level, that’s a different setting and won’t be affected
Where to Find It
Admin Console path: Apps > Google Workspace > Gmail > End-user access
📄 Google documentation: Allow per-user outbound gateways

What Your Team Will Notice
Nothing. This is an admin-level setting that users almost never configure. Disabling it prevents future misuse without changing anyone’s current experience.
Common Mistakes
- Not knowing this setting exists. Most admins skip right past it. Check it now.
- Confusing per-user gateways with org-level mail routing. This setting is specifically about individual users choosing their own outbound server. Org-wide routing (for compliance archiving or third-party filtering) is a separate configuration.
Related Settings
- GMAIL-075: Automatic Forwarding. Another exfiltration path that should be locked down.
- GMAIL-005: SPF Record. Per-user gateways can send mail that fails your SPF checks.
- GMAIL-010: DKIM Enabled. Mail sent through non-Google servers won’t be DKIM signed.
GMAIL-090: Gmail End User Access Settings Configured
What This Does
This setting controls your Google sync settings and how users can access their Gmail outside of a web browser. It covers three protocols: IMAP (lets email apps like Apple Mail or Thunderbird sync your mailbox), POP (downloads a copy of emails to a local app), and Google Workspace Sync (syncs Gmail, Calendar and Contacts to Microsoft Outlook via Exchange ActiveSync).
Why It Matters
Every access method you leave open is another door into your email. IMAP and POP connections often bypass some of the security protections that the Gmail web interface provides. They can also be harder to audit. A user connecting via POP downloads a full copy of the mailbox to a local device, which means email data now lives outside Google’s protections.
In most audits we run, IMAP and POP are enabled by default but nobody is actually using them. The organization migrated to Google Workspace years ago, everyone uses the web interface or the mobile app, and these legacy protocols are just sitting there waiting to be exploited.
Google Workspace Sync (which syncs Gmail, Calendar and Contacts to Outlook via ActiveSync) is particularly worth watching. It stores a local copy of email data on whatever machine runs Outlook. If that machine isn’t encrypted or properly managed, your email data is sitting unprotected on a hard drive.
Relevant to: SEC and HIPAA require control over where email data is stored and how it’s accessed.
What We Recommend
- Disable POP access. Re-enable only if a specific business process requires it
- Disable IMAP access. Re-enable only if users need third-party email clients
- Disable Google Workspace Sync (see GMAIL-100 for details on Outlook sync)
- If you need IMAP for a specific app or integration, restrict IMAP by allowlisting the OAuth client ID of the application.
Where to Find It
Admin Console path: Apps > Google Workspace > Gmail > End-user access
📄 Google documentation: Turn POP and IMAP access on or off

What Your Team Will Notice
Anyone using a third-party email client (Apple Mail, Thunderbird, or Outlook via IMAP) will lose access to their email in that app. They’ll need to switch to the Gmail web interface, the Gmail mobile app, or a supported connection method.
This is one of the more disruptive changes for organizations where some people prefer a desktop email client. Survey your team first.
Sample message to your team:
Hi team,
Starting \[date\], we’re tightening how email can be accessed to better protect our data. Going forward, email should be accessed through the Gmail web interface (mail.google.com) or the Gmail mobile app.
What you need to do:
- If you use Apple Mail, Thunderbird, or another desktop email app to read your work email, please switch to using Gmail in your web browser before \[date\]
- On your phone, make sure you’re using the official Gmail app
If you rely on a desktop email app for a specific business reason, let \[IT contact/helpdesk\] know and we’ll work out a solution for you.
Common Mistakes
- Turning everything off without asking who uses what. Survey first. Some employees may have a legitimate workflow built around a desktop email client.
- Forgetting about service accounts and integrations. Some business tools connect to Gmail via IMAP to process incoming messages (like ticketing systems). Disabling IMAP breaks these.
- Leaving POP enabled “because it’s always been on.” POP access downloads a full copy of the mailbox. If nobody is using it, turn it off.
Related Settings
- GMAIL-100: Google Workspace Sync for Outlook. A related but separate access method.
- GMAIL-075: Automatic Forwarding. Another path email data can leave the platform.
- DEVICE-005: Mobile Device Management. Controls which devices can access Google services.
GMAIL-100: Google Workspace Sync for Microsoft Outlook Configured
What This Does
Google Workspace Sync for Microsoft Outlook (GWSMO) is a plugin that lets users access their Gmail, Calendar, and Contacts through Microsoft Outlook on a desktop computer. It syncs a copy of the mailbox to Outlook’s local data file.
Why It Matters
GWSMO stores email data locally on whatever computer runs Outlook. That local copy sits outside of Google’s security controls. If the computer isn’t encrypted, anyone who accesses that machine can read the email data. If the machine is compromised by malware, the attacker gets a full copy of the mailbox without touching Google’s servers.
This matters most for organizations that have moved to Google Workspace but still have a few users who insist on using Outlook. The Gmail sync settings for Outlook create a secondary copy of your data that’s harder to protect and harder to audit.
For Google sync settings in general, the goal is to minimize the number of places where email data lives outside your primary platform.
What We Recommend
- Disable GWSMO if your team has fully transitioned to Gmail’s web interface or mobile app
- If some users need Outlook:
- Limit GWSMO to specific OUs that have a documented business need
- Make sure those machines have full-disk encryption enabled
- Include those devices in your endpoint management (DEVICE-005)
Where to Find It
Admin Console path: Apps > Google Workspace > Gmail > End-user access > Google Workspace Sync
📄 Google documentation: Turn Google Workspace Sync on or off
What Your Team Will Notice
Users who access Gmail through Outlook will lose that connection. They’ll need to switch to the Gmail web interface or the Gmail mobile app.
For users who have been on Outlook for years, this can feel like a big change. Give them time and training resources.
Sample message to your team:
Hi team,
Starting \[date\], we’re phasing out the Google Workspace Sync plugin for Microsoft Outlook. Going forward, please use Gmail directly at mail.google.com or through the Gmail app on your phone.
What you need to do before \[date\]:
- Start using Gmail in your web browser (mail.google.com) as your primary email
- If you have emails saved locally in Outlook that aren’t in Gmail, let \[IT contact/helpdesk\] know so we can help make sure nothing is lost
Gmail’s web interface has keyboard shortcuts, offline access, and most of the features Outlook offers. We’re happy to help you get set up.
Common Mistakes
- Disabling GWSMO without checking for local-only data. Some users may have emails or calendar items that only exist in their local Outlook data file. Check before cutting off access.
- Ignoring the local data file after disabling sync. The Outlook PST/OST file remains on the machine even after GWSMO is removed. Those files may contain sensitive email data and should be securely deleted.
Related Settings
- GMAIL-090: End User Access Settings. IMAP and POP are alternative access methods with similar risks.
- DEVICE-015: Mobile Device Encryption. If data lives locally, the device must be encrypted.
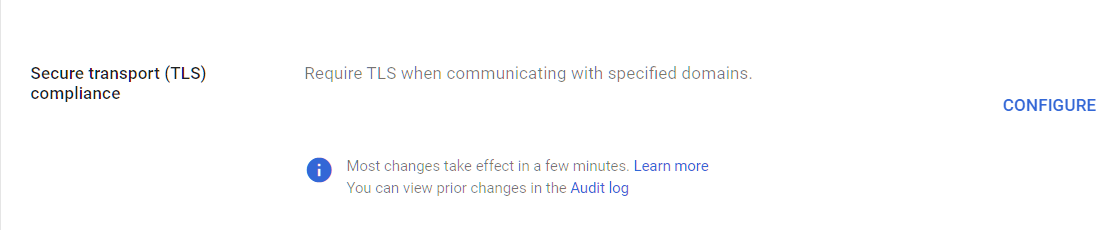
GMAIL-105: Sensitive Data Sent via Encrypted Means Only
What This Does
This setting addresses how your organization handles email encryption for sensitive data. Google Workspace encrypts email in transit using TLS (Transport Layer Security) by default, but TLS only protects messages between mail servers. It doesn’t protect the content of the email itself. True email encryption for Google Workspace means the message content is protected end-to-end, so only the intended recipient can read it.
Why It Matters
TLS is better than nothing, but it has limits. It only works if both the sender’s and receiver’s mail servers support it. And even when TLS is in use, the email content is readable at both mail servers. For sensitive data like financial records, health information, or legal documents, that’s not enough.
The FBI reported $55 billion in cumulative BEC losses from 2013 through 2023. In many BEC cases, attackers intercept unencrypted emails containing wire transfer instructions or sensitive client data. Getting email encryption Google Workspace right means going beyond default TLS. Proper encryption makes intercepted messages unreadable.
In most audits, we find that organizations have no Google Workspace secure email policy or tooling for encrypting sensitive outbound email beyond default TLS. Staff send financial data, client social security numbers, and contracts as plain email attachments.
Relevant to: HIPAA requires encryption for email containing PHI. SEC Reg S-P and Reg S-ID expect protection of client financial data. CMMC requires encryption of controlled unclassified information (CUI).
What We Recommend
- Enforce TLS for domains where you regularly exchange sensitive data (like your bank, law firm, or key clients). Google calls this “Require TLS” in compliance routing
- Implement a secure email solution for messages containing regulated or sensitive content. Options include Google Workspace Client-Side Encryption (CSE) for Enterprise Plus, or a third-party encryption service that integrates with Gmail
- Create a clear policy that tells staff which types of data require encryption and how to use the tool
- Don’t rely on password-protected ZIP files. They’re easy to crack and most compliance frameworks don’t consider them real encryption
Where to Find It
Admin Console path: Apps > Google Workspace > Gmail > Compliance (for TLS enforcement) and Apps > Google Workspace > Gmail > Routing (for routing rules)
📄 Google documentation: Require TLS for certain domains
What Your Team Will Notice
If you enforce TLS for specific domains, there’s no user-facing change if everything is configured properly. Messages to those domains are encrypted automatically.
However, use this setting with caution. If the recipient domain doesn’t have TLS properly configured, your forced-TLS emails will bounce back.
If you deploy a secure email tool, users will have a new step when sending sensitive data. The specifics depend on the tool, but it usually means clicking a button or selecting an option before sending.
Sample message to your team:
Hi team,
Starting \[date\], we’re adding a secure email option for sending sensitive information (client financials, account numbers, health records, etc.). When sending this type of data, you’ll use \[tool name/process\] instead of regular email.
What you need to do:
- For everyday email, nothing changes
- When sending sensitive client data, \[specific instruction for your chosen tool\]
We’ll run a quick training session on \[date\] to walk through the process. It adds about 10 seconds to sending a sensitive email but makes sure client data is protected. Contact \[IT contact/helpdesk\] with questions.
Common Mistakes
- Thinking TLS alone is enough. TLS protects data in transit between servers, but it doesn’t encrypt the email content itself. If an attacker has access to either mail server, they can read the message.
- Buying an encryption tool but not training the team. If staff don’t know when or how to use it, they won’t. Make the policy clear and the process simple.
- Password-protecting attachments and calling it “encrypted.” A password-protected PDF or ZIP file is not real encryption. Most can be cracked in minutes.
Related Settings
- GMAIL-125: DLP Rules. DLP can detect sensitive data and enforce encryption automatically.
- GMAIL-025: MTA-STS. Enforces TLS for inbound mail.
- ADMIN-075: Client-Side Encryption. Google’s built-in end-to-end encryption for Enterprise Plus.
CAL-005: Calendar Sharing with External Users Disabled
What This Does
This is one of the most important Google Calendar security settings. It controls whether people in your organization can share their Google Calendar details with anyone outside your domain. When unrestricted, external users can see meeting titles, attendee lists, locations, and attached notes. This setting lets you limit external visibility to just free/busy status, or block external sharing entirely.
Why It Matters
Getting your Google Calendar privacy settings right matters because calendar details reveal more than most people realize. Meeting titles like “Q4 Budget Review with Smith & Associates” or “Due Diligence Call, Acme Acquisition” tell an outsider exactly what your business is working on and with whom. Attendee lists expose your client relationships. Meeting locations reveal travel patterns. For financial advisors and wealth management firms, this kind of information is directly tied to client confidentiality.
We flag this in almost every audit we run. The default Google Workspace calendar sharing settings allow users to share full calendar details externally, and most admins don’t think to check it. We regularly find organizations where calendar sharing is set to allow full visibility to external users. That’s a gap that should have been closed at setup.
Relevant to: SEC Regulation S-P (client data protection), HIPAA (appointment schedules can constitute PHI), and FINRA supervisory requirements.
What We Recommend
- External sharing: Set to “Only free/busy information (hide event details)” or “No sharing” depending on your business needs
- Internal sharing: “Only free/busy information” is a safe default; users can selectively share more with specific colleagues
- Review both primary calendar settings and secondary/resource calendar settings separately
Where to Find It
Admin Console path: Apps > Google Workspace > Calendar > Sharing Settings
📄 Google documentation: Set Google Calendar sharing options
What Your Team Will Notice
If your team previously shared full calendar details with external contacts (clients, vendors, partners), those people will now only see free/busy times or nothing at all. Some employees may get questions from external contacts who used to check their availability through shared calendars.
The workaround is simple: users can still share specific calendars with specific people when they need to. This setting controls the organization-wide default for Google Calendar permissions, not individual sharing choices. Your team keeps control over intentional sharing.
Sample message to your team:
Hi team,
Starting \[date\], we’re updating our Google Calendar sharing settings so that people outside our organization can only see whether you’re free or busy, not the details of your meetings.
What this means for you:
- External contacts who previously saw your full calendar will now only see free/busy blocks
- You can still share specific calendars with specific people if you need to (just right-click the calendar and choose “Settings and sharing”)
This protects our client meeting details and internal schedules from unintended exposure. If you have questions, contact \[IT contact/helpdesk\].
Common Mistakes
- Leaving the default in place. Google’s default allows more sharing than most businesses intend. We see this misconfiguration constantly. It’s a one-minute fix with outsized impact.
- Only changing external sharing and forgetting internal defaults. Internal sharing settings matter too, especially if you have contractors or temporary staff in separate OUs.
- Not checking resource calendars. Conference room calendars often have different sharing settings than user calendars. Meeting rooms named “Board Room, 4th Floor” or “Client Conference Room” tell outsiders about your office layout.
Related Settings
- CHAT-045: Calendar Offline Access Disabled. Reduces cached calendar data on local devices.
- DRIVE-005: External Drive Sharing Disabled or Restricted. Similar external sharing controls for files and documents.
- MON-055: Data Retention Configured (Vault). Calendar data may fall under your retention policy.
GMAIL-110: Outbound Email Disclaimer Configured
What This Does
Google Workspace can automatically append a disclaimer (also called a footer) to outbound emails. This text gets added to the bottom of every email sent to external recipients, internal recipients, or both.
Why It Matters
Email disclaimers serve two purposes. First, they provide legal protection. A confidentiality notice at the bottom of every email establishes that the content is intended only for the named recipient. Second, they reinforce your brand and professionalism.
Disclaimers aren’t bulletproof legal shields. But they do demonstrate that your organization takes data handling seriously. For regulated industries, having a standard confidentiality notice on outbound email is a baseline expectation that auditors check.
This is a low-effort change. It takes about five minutes to set up and doesn’t affect how anyone uses email.
What We Recommend
- Configure an outbound disclaimer for all emails sent to external addresses
- Keep the text short and professional. A long legal paragraph that nobody reads is worse than a concise two-sentence notice
- At a minimum, include:
- A statement that the email is confidential and intended only for the named recipient
- Instructions to notify the sender if received in error
- Don’t include internal-only disclaimers. If you don’t have a regulatory reason for them, skip it. Internal footers clutter up every conversation thread
Where to Find It
Admin Console path: Apps > Google Workspace > Gmail > Compliance > Append Footer
📄 Google documentation: Add a footer to outgoing emails

What Your Team Will Notice
A small text block appears at the bottom of outbound emails. Users don’t need to do anything, and they can’t accidentally delete or modify the footer because it’s added server-side after the email is sent.
Common Mistakes
- Writing a 200-word legal paragraph. Nobody reads long footers. Keep it to 2-3 sentences.
- Adding disclaimers to both internal and external emails. Internal disclaimers add clutter to every conversation thread. Apply the footer to external messages only unless regulations require otherwise.
Related Settings
- GMAIL-105: Sensitive Data Encryption. A disclaimer doesn’t protect content. Encryption does.
- GMAIL-125: DLP Rules. DLP can add warnings or block emails based on content, which provides stronger protection than a disclaimer.
GMAIL-115: Comprehensive Mail Storage Enabled
What This Does
Comprehensive mail storage saves a copy of all sent and received emails in users’ Gmail mailboxes, including messages sent through other Google services (Calendar invitations, Drive sharing notifications, Google Chat emails, and more). It also catches messages sent via non-Gmail methods like configured SMTP relay.
Why It Matters
This setting fills a gap most admins don’t know they have. A meeting invitation sent through Calendar, a document share notification from Drive, or a message sent via an SMTP relay doesn’t always end up in the user’s mailbox. That means your Google Workspace email logs and any retention or legal hold policies you have in Google Vault may not capture everything.
For compliance purposes, you need a complete record of all email communication. If you’re subject to SEC record-keeping, HIPAA, or any litigation hold, a gap in your email archive is a real problem. Enabling this setting fills those gaps.
What We Recommend
- Enable comprehensive mail storage for the entire organization
- This is a one-click setting. It doesn’t change how email works or what users see. It just makes sure everything is captured
- However, be sure to review the “important considerations” on this Google page before enabling this setting.
- After enabling, verify that your Google Vault retention rules cover the stored messages
Where to Find It
Admin Console path: Apps > Google Workspace > Gmail > Compliance > Comprehensive mail storage
📄 Google documentation: Set up comprehensive mail storage

What Your Team Will Notice
Nothing. Email storage works silently in the background. Users don’t see any difference in their email experience.
Common Mistakes
- Assuming Gmail already captures everything. It doesn’t, by default. Messages sent through Calendar, Chat, and other services may not be stored in the user’s mailbox without this setting.
- Enabling mail storage but not checking Vault retention. Archival storage puts messages in the mailbox, but Google Vault controls how long they’re kept. Make sure your retention rules cover these messages (MON-055).
Related Settings
- MON-055: Data Retention (Vault). Controls how long email data is retained.
- GMAIL-125: DLP Rules. DLP scans stored messages, so comprehensive storage means DLP has better coverage.
GMAIL-120: Gmail Web Offline Disabled
What This Does
Gmail’s offline mode lets users read, search, and compose emails without an internet connection. It stores a copy of recent email data in the browser’s local storage on the device. When the device reconnects, it syncs any changes back to the server.
Why It Matters
Offline mode caches email data on the device’s local storage. If that device is lost, stolen, or used by someone else, the cached email data is accessible without signing into Google. It persists even after the user signs out of their Google account, unless they specifically clear the cache.
This is a Gmail security setting that gets overlooked because it seems like a convenience feature. But it creates an unmanaged copy of email data on every device where a user enables it. For organizations that need to control where email data lives, offline mode is a gap.
The risk is lower if your devices are encrypted and managed. But for organizations with personal or shared devices, cached email data on a device you don’t control is a problem.
What We Recommend
- Disable Gmail offline for the organization. Re-enable only if your team regularly works without internet access
- If offline access is needed (field workers, travel-heavy roles), enable it only for specific OUs and make sure those devices have full-disk encryption and endpoint management
Where to Find It
Admin Console path: Apps > Google Workspace > Gmail > User settings > Offline
📄 Google documentation: Turn offline Gmail on or off
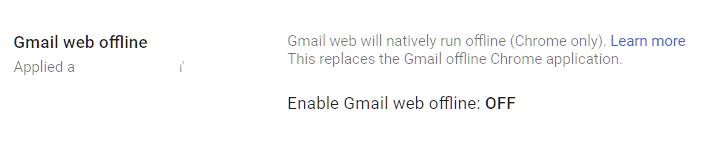
What Your Team Will Notice
Users who have enabled offline Gmail will lose the ability to read and compose emails without an internet connection. Gmail still works normally when connected.
Sample message to your team:
Hi team,
Starting \[date\], offline access for Gmail will be turned off. You’ll still use Gmail exactly as you do today when connected to the internet. This change only affects the ability to read emails without a connection.
If your role requires working without internet access, let \[IT contact/helpdesk\] know and we’ll set up an exception.
Common Mistakes
- Not clearing cached data after disabling offline mode. We see this one regularly. Disabling the setting prevents new caching, but existing cached data stays on devices until the user clears their browser data. Send instructions for clearing the cache when you make this change.
- Disabling offline for everyone when some roles genuinely need it. Sales reps who fly frequently or field technicians may need offline access. Use OUs to make exceptions.
Related Settings
- GMAIL-090: End User Access Settings. IMAP and POP also create local copies of email data.
- DEVICE-005: Mobile Device Management. Managed devices with encryption reduce the risk of cached data exposure.
- CHAT-045: Calendar Offline Access. Similar offline caching risk for Calendar data.
GMAIL-125: DLP Rules Configured for Gmail (Enterprise SKU only)
What This Does
Data Loss Prevention (DLP) rules scan outbound emails and attachments for sensitive content, like credit card numbers, Social Security numbers, bank account details, or other patterns you define. When DLP detects a match, it can warn the sender, require manager approval, block the email, or quarantine it for review.
Why It Matters
People send sensitive data by email every day without thinking about it. A staff member emails a spreadsheet with client Social Security numbers to the wrong person. An accountant sends bank routing numbers in a plain email instead of using an encrypted channel. A new hire forwards an internal document to their personal email to “read it later.”
DLP catches these mistakes before they become breaches. In Adelia Risk audits, we consistently find that organizations either have no DLP rules or have rules configured so loosely they never trigger. According to the 2025 Verizon DBIR, around 60% of breaches involve a human element, and email is the most common channel for accidental data exposure.
Google Workspace DLP email rules let you define patterns to match (credit card formats, SSN formats) and use predefined detectors (Google has built-in detectors for dozens of data types across multiple countries). This is one of the most impactful controls in your Gmail security checklist.
Relevant to: HIPAA (PHI in email), SEC (client financial data), PCI DSS (payment card data), and CMMC all require or strongly recommend DLP controls.
What We Recommend
- Start with predefined detectors for your most sensitive data types. For most organizations, that means Social Security numbers, credit card numbers, and bank account numbers
- Start in “warn only” mode. DLP rules that immediately block emails will frustrate your team and create exceptions that weaken the policy. Begin by warning users and collecting data on how often sensitive content is being sent
- After 2-4 weeks in warn mode, review the results. Adjust rules to reduce false positives, then switch to “block” or “quarantine” for the highest-risk patterns
- Add custom detectors for data specific to your business (client account numbers, internal project codes, etc.)
- Enable Optical character recognition (OCR): This setting scans text in attached images, including PDFs.
Where to Find It
Admin Console path: Security > Access and data control > Data protection > Manage Rules
📄 Google documentation: Create DLP rules for Gmail, Use optical character recognition to read images
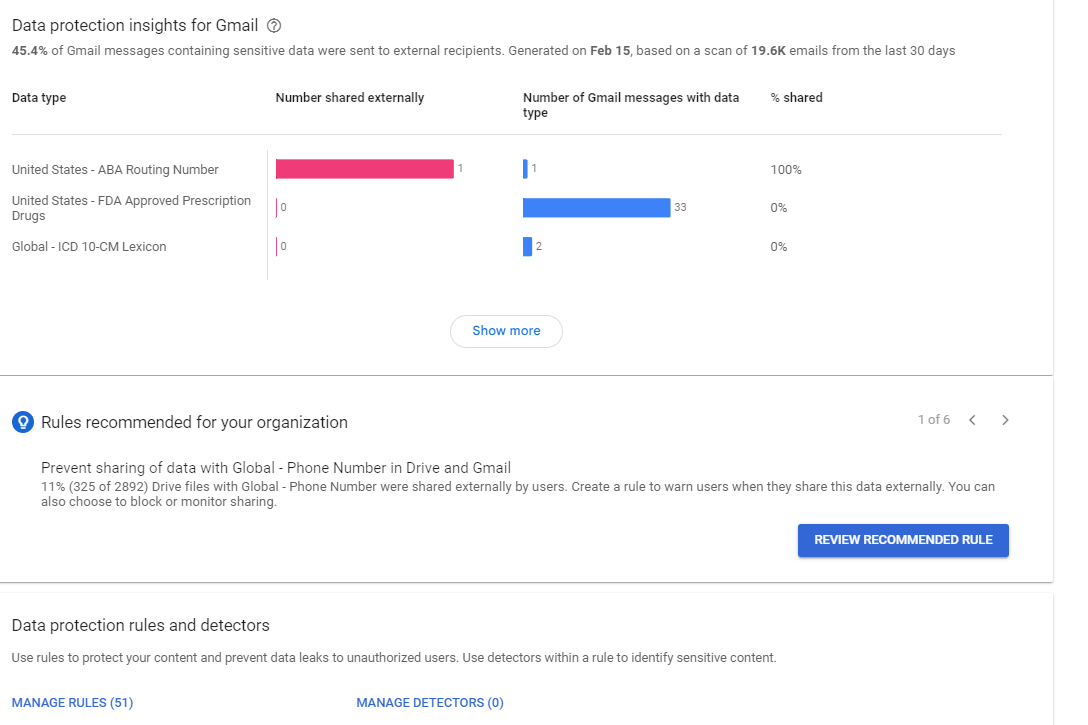
What Your Team Will Notice
In warn mode, users who try to send a message containing sensitive data see a popup asking them to confirm they want to send it. In block mode, the message is rejected and the user gets a notification explaining why.
Well-tuned DLP rules rarely trigger for legitimate business communication. The goal is to catch genuine mistakes and malicious exfiltration, not to slow down everyday email.
Common Mistakes
- Starting in block mode on day one. You’ll get flooded with complaints and exceptions. Start in warn mode, learn what your organization’s normal patterns look like, then tighten the rules.
- Only scanning email body text and ignoring attachments. Most sensitive data leaves via attachments (spreadsheets, PDFs, documents). Make sure your rules scan attachments too.
- Setting up DLP and never reviewing the logs. DLP generates reports on what it catches. If you’re not reviewing those reports, you’re missing patterns that need attention.
- Forgetting about Google Drive. Email DLP only covers email. You need separate DLP rules for Drive (DRIVE-050) and Chat (CHAT-050) to close the other exfiltration paths.
Related Settings
- GMAIL-105: Sensitive Data Encryption. DLP can enforce encryption for emails containing sensitive data.
- DRIVE-050: DLP Rules for Drive. Extends DLP protection to Google Drive files.
- CHAT-050: DLP Rules for Chat. Extends DLP protection to Google Chat messages.
- GMAIL-115: Comprehensive Mail Storage. DLP coverage is only as good as the data it can scan.
What These Settings Don’t Cover
Gmail is the largest single area in the benchmark, but email security is only one piece of a full Google Workspace security setup. Adelia Risk’s complete benchmark covers 97 settings across eight areas:
- Authentication (MFA enforcement, phishing-resistant methods, passwords, session controls, passkeys)
- Google Drive & Data Sharing (external sharing, shared drive policies, local sync, data loss prevention)
- Calendar, Chat & Meet (meeting security, chat retention, external sharing)
- Administrative Controls (admin account protection, inactive users, branding)
- Third-Party Apps & API (OAuth controls, Marketplace restrictions, API access)
- Device & Mobile Management (MDM, device approval, Chrome policies)
- Monitoring & Compliance (audit logs, alerting, Google Workspace phishing monitoring, data retention, Advanced Protection)
Each area has its own guide page with the same level of detail.
Need Help Configuring These Settings?
Some of these changes take a few minutes. Turning on enhanced pre-delivery scanning or disabling automatic forwarding are quick wins. Others, like setting up DMARC at p=reject, building DLP rules, or rolling out email encryption needs planning, testing, and communication with your team.
If you’re in a regulated industry (financial services, healthcare, defense contracting), the settings you choose also have compliance implications. Knowing what to configure is different from knowing what satisfies your regulatory requirements.
Adelia Risk provides Google Workspace security audits that review all 97 settings, give specific recommendations for your situation, and help you roll out changes without disrupting operations.
Last verified: March 2026
Part of the Adelia Risk Google Workspace Security Benchmark, 97 controls across 8 security areas.