Adelia Risk treats administrative controls as the skeleton of a Google Workspace security setup. If authentication is the front door, admin accounts are the master key. A compromised super admin can disable every other security setting in your environment, read anyone’s email, export all your files, and lock everyone else out. That makes Google Workspace super admin and admin account security one of the highest-priority areas we audit.
In 2024, the FBI’s Internet Crime Complaint Center reported $2.77 billion in losses from business email compromise alone. A growing share of those cases start with attackers gaining admin-level access, not just user-level. CISA’s Secure Cloud Business Applications (SCuBA) project now includes specific baselines for Google Workspace configuration, including common controls, reflecting how often administrative misconfigurations lead to full-environment compromise.
This page covers 16 Google Workspace admin settings that Adelia Risk reviews as part of our Google Workspace security audit services. These settings span admin account protection, account recovery, user lifecycle management, organizational branding, and advanced enterprise controls. Each section explains what the setting does, why it matters, and exactly what to change, sorted from highest risk to lowest. If you’ve been looking for Google Workspace admin help that goes beyond Google’s support docs, this is a good place to start.
Quick Reference
| Policy ID | Setting | Risk | Heads Up? | Admin Path |
|---|---|---|---|---|
| ADMIN-005 | 2-4 global admins designated | 🔴 Critical | No | Account > Admin Roles > Super Admin |
| ADMIN-010 | No “daily driver” super admin accounts | 🔴 Critical | Yes | Account > Admin Roles > Super Admin |
| ADMIN-022 | Context-aware access configured (Enterprise SKU only) | 🔴 Critical | Yes | Security > Access and data control > Context-Aware Access |
| ADMIN-025 | Super admins cannot recover their own accounts | 🔴 Critical | Yes | Security > Authentication > Account Recovery |
| ADMIN-030 | Non-super admins cannot recover their own accounts | 🟠 High | Yes | Security > Authentication > Account Recovery |
| ADMIN-020 | Post-SSO verification and login challenges configured | 🟠 High | No | Security > Authentication > Login Challenges |
| ADMIN-035 | User account recovery information controls configured | 🟠 High | No | Security > Authentication > Account Recovery |
| ADMIN-040 | Inactive accounts blocked or deleted | 🟡 Medium | Yes | Users |
| ADMIN-045 | Conflicting account management configured | 🟡 Medium | No | Account > Account Settings > Conflicting accounts management |
| ADMIN-060 | Scheduled Release track enabled (not Rapid Release) | 🟡 Medium | No | Account Settings > Preferences > New Features |
| ADMIN-065 | Multi-party approval enabled for sensitive actions | 🟡 Medium | No | Security > Authentication > Multi-party approval settings |
| ADMIN-050 | Custom logo uploaded | 🟢 Low | No | Account Settings > Personalization |
| ADMIN-055 | Data region policy set | 🟢 Low | No | Data > Compliance > Data Regions |
| ADMIN-070 | Access Approvals configured for Google support access | 🟢 Low | No | Data > Compliance > Access Approvals |
| ADMIN-075 | Client-Side Encryption reviewed and configured (Enterprise Plus) | 🟢 Low | Yes | Data > Compliance > Client-side encryption |
| ADMIN-080 | Assured Controls configured (if applicable) | 🟢 Low | No | Account Settings > Assured Controls |
| ADMIN-085 | Users prevented from downloading data (Takeout) | 🟠 High | Yes | Inactive accounts are blocked or deleted |
Heads Up? Does your team need advance notice before you make this change? “Yes” means users will see something different. We’ve included sample language you can send to your team for every “Yes” setting.
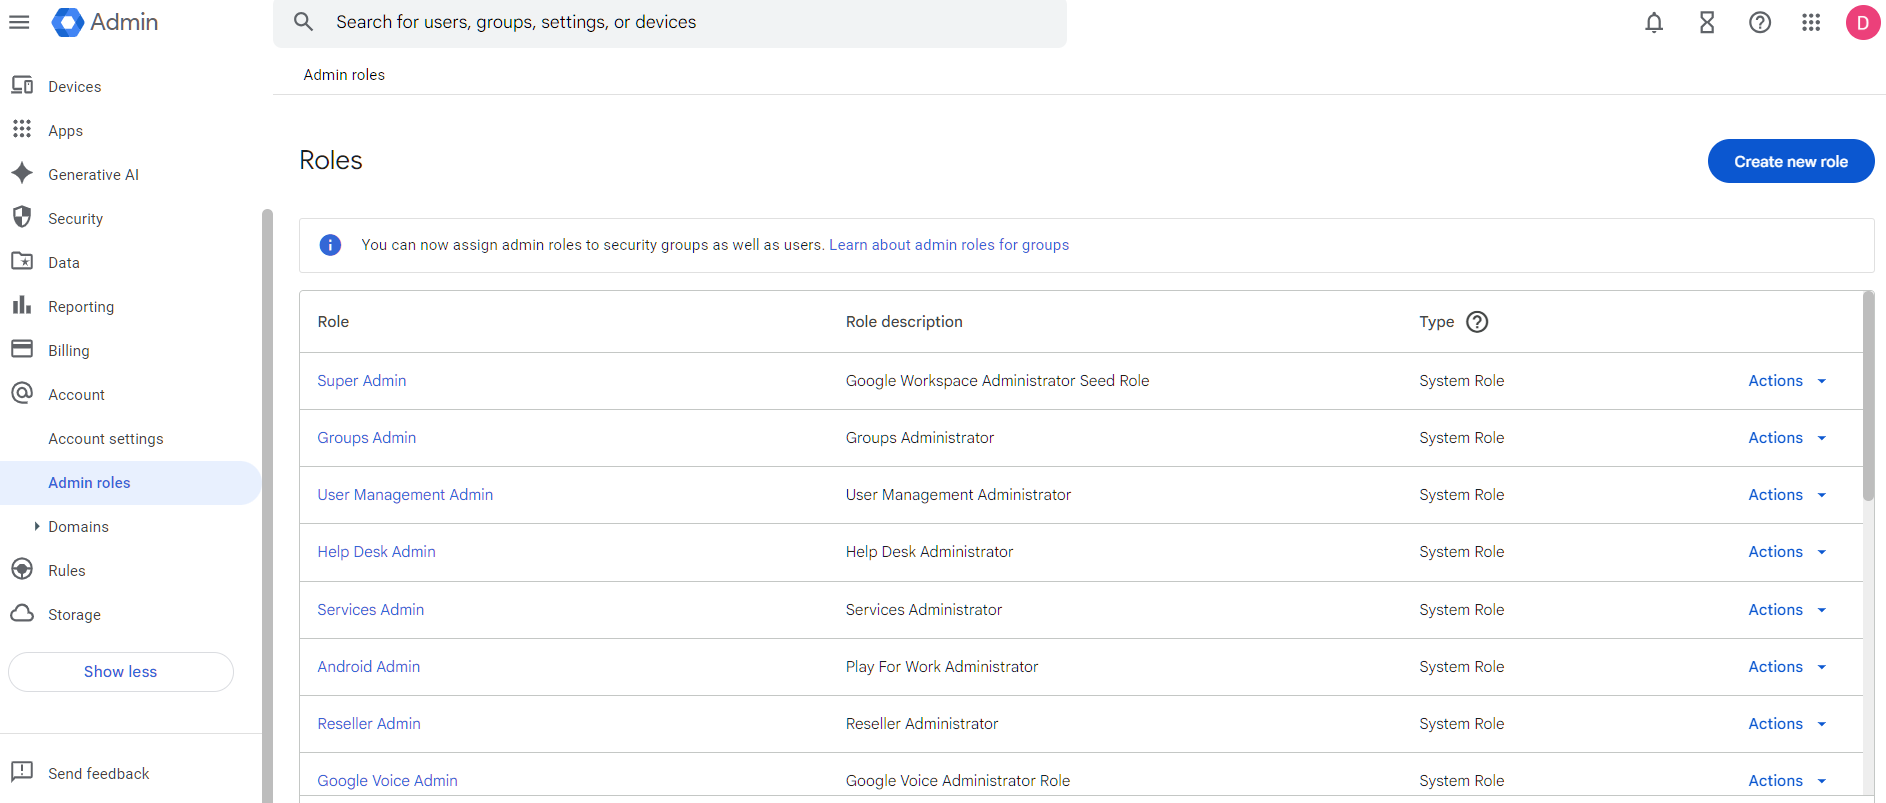
ADMIN-005: 2-4 Global Admins Designated
What This Does
This controls how many users in your Google Workspace have the Super Admin role. Super admins have unrestricted access to every setting, every user’s data, and every security control. This policy checks that you have between two and four super admin accounts, not one, and not ten.
Why It Matters
One super admin is a single point of failure. If that person is locked out, leaves the company, or gets compromised, nobody can manage your Workspace. We’ve seen this happen. A business owner leaves, and nobody else can reset passwords or manage the account. Google’s account recovery process for orphaned domains is slow and painful.
Too many super admins create the opposite problem. Every super admin account is a target. More accounts with that level of access means more chances for an attacker to find a way in. The sweet spot is two to four: enough to avoid lockout, few enough to keep the attack surface small.
Relevant to: SEC, HIPAA, and CMMC all require access controls aligned with least-privilege principles.
What We Recommend
- Designate 2-4 super admin accounts (3 is ideal for most organizations under 200 users)
- Remove the Super Admin role from anyone who doesn’t truly need it
- Use delegated admin roles for day-to-day tasks like resetting passwords or managing groups
Where to Find It
Admin Console path: Account > Admin Roles > Super Admin
📄 Google documentation: Assign admin roles

What Your Team Will Notice
Nothing. This is an admin-only change. End users don’t see admin role assignments.
Common Mistakes
- Only having one super admin. This is the most common Google Workspace super admin misconfiguration we find. If that one person’s account is compromised or they leave the company, you’re locked out of your own environment.
- Giving super admin to “the IT person” plus the whole leadership team. The CEO doesn’t need super admin access. Give executives the minimum admin role for what they actually do, if they need admin access at all.
- Forgetting about the original setup account. The Google Workspace account created during initial setup usually has a super admin. If nobody’s using it and it has a weak password, that’s a sitting target.
Related Settings
- ADMIN-010: No “Daily Driver” Super Admin Accounts. Controls how those super admin accounts are used day to day.
- ADMIN-025: Super Admins Cannot Recover Their Own Accounts. Prevents self-service password reset on these high-privilege accounts.
ADMIN-010: No “Daily Driver” Super Admin Accounts
What This Does
This policy says that super admin accounts shouldn’t be used for daily work like reading email, creating documents, or attending meetings. Super admin accounts should only be used for administrative tasks: changing settings, managing users, and reviewing security configurations.
Why It Matters
When someone uses a super admin account as their regular work account, every phishing email they open, every link they click, and every file they download carries the risk of full-environment compromise. A phishing attack against a regular user account gives the attacker access to that one person’s stuff. A phishing attack against a super admin gives the attacker access to everything.
This comes up constantly in our audits. A business owner set up Workspace, gave themselves Google Workspace super admin access, and then kept using that same account for daily work. Years later, that account is still browsing the web, opening email attachments, and clicking links with full super admin privileges.
The fix is to create separate admin accounts that are only used for admin tasks. Your daily email and documents go through a regular user account. When you need to change a Workspace setting, you sign into the admin account separately.
Relevant to: NIST 800-53 AC-6 (least privilege) applies to all regulated industries.
What We Recommend
- Create dedicated admin accounts with a naming convention like
admin-josh@yourdomain.com - Remove super admin from daily-use accounts once the dedicated admin accounts are set up
- Only sign in to admin accounts when performing admin tasks
- Don’t use admin accounts for email and web browsing
Where to Find It
Admin Console path: Admin Roles > Super Admin (review which users hold this role)
📄 Google documentation: Security best practices for administrator accounts
What Your Team Will Notice
The people who currently have super admin on their daily accounts will now have two accounts. They’ll sign into their regular account for everyday work and their admin account only when they need to make Workspace changes. This is a workflow change for those individuals.
Sample message to your team:
Hi team,
Starting \[date\], we’re separating admin accounts from daily work accounts. If you currently have admin access, you’ll receive a new dedicated admin account (like admin-yourname@ourdomain.com).
What you need to do:
- Use your regular account for email, Drive, Calendar, and daily work
- Only sign in to your new admin account when you need to change Workspace settings
- Set up MFA on both accounts
This limits the damage if any single account is ever compromised. Your daily work stays the same. If you have questions, reach out to \[IT contact/helpdesk\].
Common Mistakes
- Thinking this only applies to large companies. Even a 10-person firm needs this. The business owner’s daily-use super admin account is one of the riskiest configurations we find.
- Creating the admin accounts but still using the old ones. Old habits are hard to break. Set a reminder to check which accounts have actually been used for admin tasks versus which accounts still have the role but shouldn’t.
- Not setting up MFA on the new admin accounts. Dedicated admin accounts need the strongest authentication you can configure. Security keys or passkeys, not just an authenticator app.
- Not configuring Email Routing: Super admins with ‘Cloud Identity Free’ licenses lack active mailboxes. To avoid missing vital notifications, you must set up routing rules to forward their mail elsewhere. Manual logins are not a reliable way to stay informed.
Related Settings
- ADMIN-005: 2-4 Global Admins Designated. How many super admin accounts exist?
- AUTH-005: Two-Step Verification Enforcement. Admin accounts should have the strongest MFA.
- AUTH-010: Phishing-Resistant Auth Methods. Admin accounts should require phishing-resistant methods.
ADMIN-022: Context-Aware Access Configured (Enterprise SKU Only)
What This Does
Context-Aware Access is the “Zero Trust” gatekeeper for your Google Workspace. It allows you to move beyond the binary of “correct password \+ MFA” and instead evaluate the context of the entire session.
You can set granular rules that permit or deny access based on:
- Device Security: Is it encrypted? Does it have a screen lock? Is the OS up to date?
- Device Ownership: Is this a company-issued machine or a random personal device?
- Location/Network: Is the user connecting from a known office IP or a high-risk region?
- Access Level: Is the device “clean” enough to access sensitive Drive files, or should it only be allowed to check Gmail?
Why It Matters
MFA proves the person is who they say they are. Context-Aware Access proves that the machine they are using is safe to touch your data.
The Scenario: A manager’s credentials are stolen via a phishing site. The attacker attempts to log in from a data center in a region your company doesn’t operate in. With Geofencing enabled, Google blocks the session immediately, even if the attacker has the correct password and MFA code.
Relevant to: HIPAA, SEC, CMMC, and SOC 2. These frameworks increasingly require “conditional access” to ensure data doesn’t leak onto unmanaged or compromised hardware.
What We Recommend
- Enable context-aware access and create policies that match your risk tolerance
- Define Your “Safe Zone”: Create a “Home Base” access level that allows access from the specific countries where your team is located.
- Start with a monitor-only mode to see which devices and users would be affected before enforcing
- At minimum, block access from devices that fail basic health checks: no encryption, compromised (rooted/jailbroken), OS more than two major versions behind
- Pair this with DEVICE-045: Endpoint Verification to get device health data from desktops and laptops
If you’ve been researching Google endpoint management vs Intune, context-aware access is Google’s answer to conditional access policies. It works natively with Workspace and doesn’t require a separate MDM product for basic device trust.
Where to Find It
Admin Console path: Security > Access and data control > Context-Aware Access
📄 Google documentation: Context-Aware Access overview
What Your Team Will Notice
If a user tries to access Workspace from a device that doesn’t meet your policies, they’ll see a message explaining that access is blocked and why. The exact experience depends on which apps you protect and what your policies require.
This can cause real disruption if you enforce too aggressively on day one. A user traveling with a personal tablet, someone on a borrowed laptop, or a new hire with an older phone could suddenly lose access to email and files.
Sample message to your team:
Hi team,
Starting \[date\], we’re adding device requirements for accessing Google Workspace. This means your device needs to meet certain security standards (like having encryption turned on and an up-to-date operating system) to access work email, files, and apps.
What you need to do:
- Make sure your phone and computer are running the latest OS updates
- If you use a personal device for work, confirm it has a screen lock and encryption enabled (most modern devices do by default)
- If you get blocked, the error message will explain what needs to change
We’re rolling this out in stages, so you may not see any change right away. If you run into access issues, contact \[IT contact/helpdesk\] and we’ll get you sorted.
Common Mistakes
- Creating policies but never enforcing them. Google lets you set policies in “monitor” mode. That’s useful for testing, but if you never flip to “active,” the policies do nothing. We see this in about half the environments we review.
- Blocking too much on day one. Start by requiring encryption and blocking compromised devices. Add stricter requirements (OS version, managed-only access) once you’ve confirmed your user base can comply.
- Forgetting that context-aware access requires Endpoint Verification for desktop devices. Without DEVICE-045, you only get device signals from mobile. Desktops and laptops are invisible.
Related Settings
- DEVICE-045: Endpoint Verification. Required for context-aware access to work on desktops and laptops.
- DEVICE-005: Mobile Device Management. MDM provides the “managed device” signal that context-aware access can check.
- AUTH-025: Session Timeout & Re-Authentication. Session controls complement device-level access controls.
ADMIN-025: Super Admins Cannot Recover Their Own Accounts
What This Does
Google Workspace has a self-service account recovery feature that lets users reset their own passwords using a recovery email address or phone number. This setting controls if super admin accounts can use that feature. When disabled, super admins must contact another super admin to recover their account.
Why It Matters
If a super admin can recover their own account through a personal email or phone number, an attacker only needs to compromise that recovery channel to take over the most powerful account in your Workspace. A SIM swap attack on the admin’s phone number or a compromised personal Gmail gives the attacker a direct path to full super admin access.
Adelia Risk flags this in almost every audit. Google leaves self-recovery enabled by default, and most admins never think to turn it off. But the logic is straightforward: super admin accounts are the highest-value target in your organization. The recovery process for those accounts should require a second person, not a personal phone number that could be stolen.
Relevant to: HIPAA, SEC, and CMMC all require access controls for privileged accounts.
What We Recommend
- Disable self-recovery for all super admin accounts
- Make sure you have at least two super admins so one can always recover the other (see ADMIN-005)
- Document the recovery process so everyone knows what to do if a super admin is locked out
Where to Find It
Admin Console path: Security > Authentication > Account Recovery
📄 Google documentation: Allow super admins to recover their account

What Your Team Will Notice
Super admins will no longer be able to reset their own passwords through self-service recovery. If they’re locked out, they’ll need to contact another super admin. For daily users (non-admins), nothing changes with this specific setting.
Sample message to your team:
Hi team,
Starting \[date\], super admin accounts will no longer be able to reset their own passwords. If a super admin gets locked out, another super admin will handle the reset.
What you need to do:
- Make sure you know who the other super admins are
- Keep your MFA methods current so you don’t get locked out in the first place
This prevents an attacker from using a stolen phone number or personal email to take over an admin account. It takes away one of the easiest attack paths to our most sensitive accounts.
Common Mistakes
- Turning off self-recovery without having a second super admin. If there’s only one super admin and they can’t recover their own account, you may need Google’s help to regain access. That process can take weeks.
- Leaving recovery phone numbers and emails on admin accounts. Even after disabling self-recovery, old recovery contact info can be a data point for social engineering. Remove it from super admin accounts.
- Not testing the recovery process. Before you disable self-recovery, make sure the other super admin can actually reset the first one’s password. Test it.
Related Settings
- ADMIN-005: 2-4 Global Admins Designated. You need multiple super admins before disabling self-recovery.
- ADMIN-030: Non-Super Admins Cannot Recover Their Own Accounts. Same concept applied to all admin accounts.
- ADMIN-035: User Account Recovery Information Controls. Controls how recovery information is managed across all users.
ADMIN-030: Non-Super Admins Cannot Recover Their Own Accounts
What This Does
This extends the same self-recovery restriction from super admins to all other admin and user accounts. When disabled, regular users can’t reset their own passwords through a recovery email or phone number. They must contact an admin.
Why It Matters
The reasoning is similar to super admin self-recovery, but at a broader scale. If any user can recover their own account via a personal email or phone, an attacker who compromises that personal channel can take over the work account. For admin accounts below the super admin level, this is a direct security gap because those accounts still have elevated privileges.
For regular user accounts, the risk is lower but still real. A compromised personal Gmail account becomes an entry point into your organization if that Gmail is listed as a recovery address.
Relevant to: SEC Reg S-P and HIPAA both require safeguards against unauthorized account access.
What We Recommend
- Disable self-recovery for all users in your organization
- Set expectations that password resets go through IT or a designated admin
- Have a process for after-hours lockouts if your team works evenings or weekends
Where to Find It
Admin Console path: Security > Authentication > Account Recovery
📄 Google documentation: Set up password recovery for users
What Your Team Will Notice
Users who forget their password will no longer be able to reset it themselves. They’ll need to contact an admin. This creates a small support burden but closes a real attack vector.
Sample message to your team:
Hi team,
Starting \[date\], password resets will go through IT instead of self-service recovery. If you forget your password, contact \[IT contact/helpdesk\] and we’ll get you back in quickly.
Why we’re doing this: Self-service recovery relies on personal email or phone numbers, which can be compromised. Having IT handle resets keeps work accounts safer.
What to expect:
- If you get locked out, reach out to \[IT contact/helpdesk\]
- Response time is typically under 30 minutes during business hours
- Keep your MFA methods up to date so lockouts are rare
This is a small change that removes a common attack path.
Common Mistakes
- Disabling self-recovery without a support process. If users can’t reset their own passwords and there’s no one available to help, people get locked out with no recourse. Have a documented process and make sure at least one admin is reachable during work hours.
- Leaving recovery info in place after disabling the feature. Old recovery emails and phone numbers still show up in the Admin Console. Clean them up to reduce confusion.
Related Settings
- ADMIN-025: Super Admins Cannot Recover Their Own Accounts. The same control for super admins.
- ADMIN-035: User Account Recovery Information Controls. Manages what recovery information users can add.
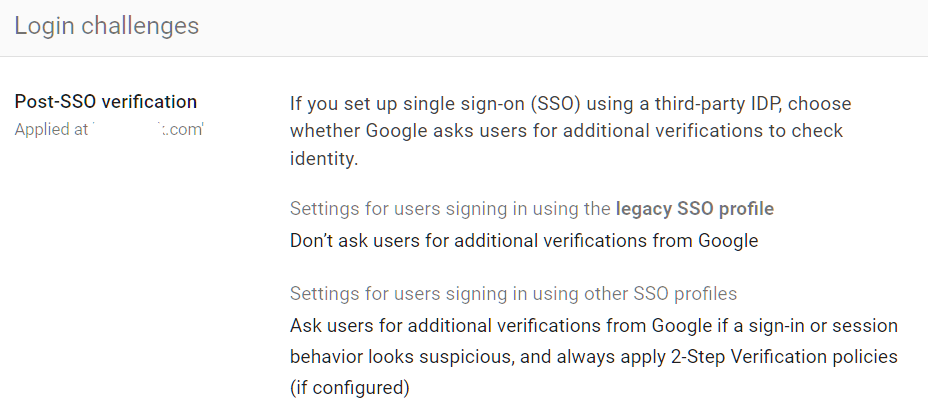
ADMIN-020: Post-SSO Verification and Login Challenges Configured
What This Does
Even when users authenticate through a third-party SSO provider, Google Workspace can apply its own additional verification checks. Login challenges are extra prompts Google shows when it detects something unusual about a sign-in attempt, like a new device, an unfamiliar location, or a suspicious pattern. This setting controls whether those Google-side challenges are active for SSO users.
Why It Matters
Without post-SSO verification, Google trusts the SSO provider completely. If the SSO provider says a user is authenticated, Google lets them in with no additional checks. That means a compromised SSO token gives unrestricted access to Workspace with no chance for Google to catch something suspicious.
With post-SSO verification enabled, Google adds its own intelligence layer on top. If the SSO provider authenticates someone, Google can still challenge the login if the behavior doesn’t match the user’s normal pattern. This is a safety net for scenarios where the SSO itself is compromised or a session token is stolen.
Relevant to: CISA SCuBA baseline recommends enabling post-SSO verification for all Google Workspace tenants.
What We Recommend
- Turn on post-SSO verification for all users
- Enable login challenges so Google can flag suspicious sign-ins even after SSO authentication
- Don’t disable this to reduce user friction. The challenges only appear when something looks unusual
Where to Find It
Admin Console path: Security > Authentication > Login Challenges
📄 Google documentation: Verify a user’s identity with Login challenges
What Your Team Will Notice
Nothing in normal circumstances. Login challenges only appear when Google detects something unusual. Most users will never see them. When they do appear, they’ll be asked to verify their identity through an additional step (like confirming on their phone).
Common Mistakes
- Disabling login challenges because users complained. A few users hitting challenges doesn’t mean the feature is broken. It means Google is catching unusual patterns. Investigate the cause rather than turning off the protection.
- Assuming SSO handles everything. SSO authenticates users. It doesn’t detect suspicious post-authentication behavior. Google’s login challenges fill that gap.
Related Settings
- AUTH-030: Security Rules ON. Security rules can alert on unusual login patterns that login challenges might catch.
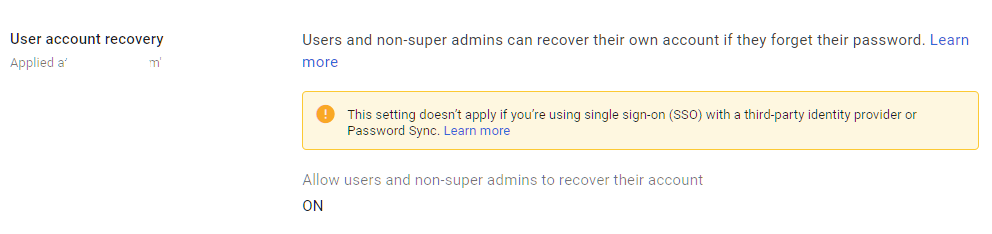
ADMIN-035: User Account Recovery Information Controls Configured
What This Does
Google Workspace lets users add personal recovery information (a phone number or personal email) to their work accounts. This setting controls if users can add that information and if admins manage it centrally. It also affects what recovery options are available when users (or attackers) attempt account recovery.
Why It Matters
Personal recovery information cuts both ways. It helps users get back into their accounts if they forget their password. But it also gives attackers a path in. If an attacker controls the personal email or phone number listed as recovery info, they can potentially bypass your organization’s security controls.
Google’s Security Health page flags this as a configuration to review because unmanaged recovery information is one of the most overlooked security gaps in Workspace environments. We regularly find organizations where every user has a personal Gmail listed as their recovery address, and nobody has reviewed whether that’s appropriate.
Relevant to: HIPAA and SEC both require controls over account access and recovery mechanisms.
What We Recommend
- Disable users’ ability to add their own recovery information (phone and email) if you’ve already disabled self-recovery
- Remove existing personal recovery info from user accounts, especially admin accounts
- If you allow recovery info, restrict it to corporate-controlled phone numbers or email addresses
Where to Find It
Admin Console path: Security > Authentication > Account Recovery
📄 Google documentation: Control who can recover their account

What Your Team Will Notice
Nothing visible to users. This is an admin-side configuration. Users may notice they can no longer add a personal recovery email or phone number to their work Google account, but most users never touch this setting.
Common Mistakes
- Allowing self-recovery while also allowing users to set their own recovery info. This combination means any user can set a personal Gmail as their recovery address and then use it to reset their password. An attacker who compromises the personal Gmail can do the same.
- Not auditing existing recovery information. Changing the policy going forward doesn’t remove recovery info that’s already been added. You need to audit and clean up existing entries.
Related Settings
- ADMIN-025: Super Admins Cannot Recover Their Own Accounts. Recovery controls specific to super admins.
- ADMIN-030: Non-Super Admins Cannot Recover Their Own Accounts. Recovery controls for all other users.
ADMIN-040: Inactive Accounts Blocked or Deleted
What This Does
This policy checks for user accounts that haven’t been logged into for an extended period (typically 30+ days) and ensures they are either suspended or deleted. Inactive accounts are accounts that still exist with valid credentials but nobody is using them.
Why It Matters
Inactive accounts are sitting targets. A former employee’s account that was never disabled, a contractor who finished their project three months ago, and a test account someone created and forgot about. These accounts still have valid passwords, still receive email, and still have access to shared files. An attacker who finds credentials for an inactive account can use it without anyone noticing, because nobody’s watching that account’s activity.
Adelia Risk flags inactive accounts in most audits. The typical finding is two or three accounts that haven’t been used in months but still have full access. Sometimes they belong to former employees. Sometimes they’re old test accounts with weak passwords.
Relevant to: SEC, HIPAA, and CMMC all require periodic review and removal of inactive access.
What We Recommend
- Review your user list monthly for accounts with no recent login activity
- Suspend accounts that have been inactive for 30+ days (suspension preserves data while blocking access)
- Delete accounts only after you’ve confirmed the data has been archived or transferred
- Set a calendar reminder for monthly reviews, or build it into your offboarding process
Where to Find It
Admin Console path: Users (sort by “Last sign-in” column to find inactive accounts)
📄 Google documentation: Suspend or restore a user account
What Your Team Will Notice
If you suspend or delete an account that someone is actually still using (rare, but possible if someone was on extended leave), they’ll be locked out. Always verify before taking action.
Sample message to your team:
Hi team,
We’re cleaning up unused Google Workspace accounts. If you manage any shared or service accounts, please let \[IT contact/helpdesk\] know by \[date\] so we don’t accidentally suspend something that’s still in use.
This won’t affect anyone who’s been logging in regularly. We’re only looking at accounts that haven’t been used in over 30 days.
Common Mistakes
- Deleting instead of suspending first. Deletion is permanent after 20 days. Suspend the account first, confirm you don’t need it, then delete.
- Not checking shared resources. An inactive account might own shared drives or documents. Deleting it can break access for other users. Transfer ownership first.
- Only checking once during the audit and never again. Inactive accounts accumulate over time. This needs to be a recurring process, not a one-time cleanup.
- Not using Google Archived User licenses. If someone no longer needs active access but you need to keep their data in Vault, Archived User licenses are cheaper than keeping a full Workspace seat. You can assign them individually and the user goes into a suspended state while their data stays intact. Most firms we work with don’t know this option exists.
Related Settings
- ADMIN-045: Conflicting Account Management. Handles accounts that were created outside your organization’s control.
- MON-005: Review Google’s Audit Logs. Audit logs can help identify accounts with suspicious or absent activity patterns.
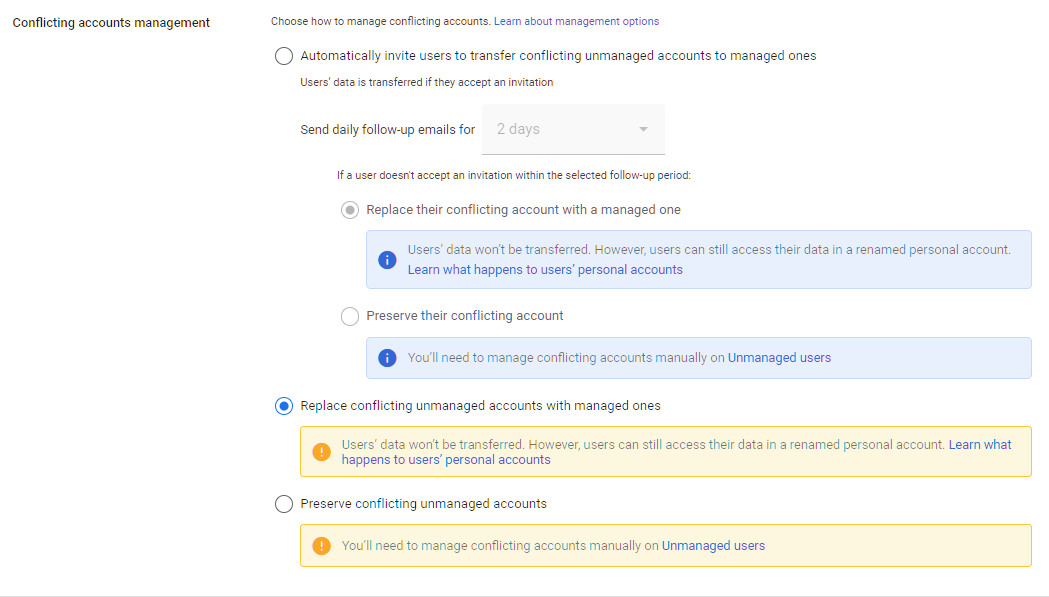
ADMIN-045: Conflicting Account Management Configured
What This Does
A “conflicting account” happens when someone at your company created a personal Google account using their work email address before your organization set up Google Workspace. When you add that email to Workspace, Google detects the conflict: there’s already a personal account using that address. This setting controls what happens to those conflicting accounts.
Why It Matters
Conflicting accounts create a split identity problem. The user might have a personal Google account with work data in it (Drive files, contacts, calendar entries) that your organization can’t manage or monitor. That data lives outside your admin controls, outside your retention policies, and outside your security settings.
The right move is to replace conflicting accounts with managed ones. Google gives you options: invite the user to transfer their data into the managed account, force-replace the account after a grace period, or take no action. Taking no action means unmanaged data stays unmanaged.
What We Recommend
- Set to automatically invite users to transfer conflicting unmanaged accounts to managed ones
- Communicate the timeline clearly so nobody loses personal data unexpectedly
Where to Find It
Admin Console path: Account Settings > Conflicting accounts management
📄 Google documentation: Find and manage conflicting accounts
What Your Team Will Notice
For most organizations, this setting is configured during initial Workspace setup and doesn’t need to change. If you’re adjusting it now, affected users will receive a notification from Google about their conflicting account and instructions for how to resolve it.
Common Mistakes
- Leaving the setting on “Preserve conflicting unmanaged accounts.” This means unmanaged accounts using your domain continue to exist outside your control indefinitely.
- Not communicating the grace period. Users with conflicting accounts may have personal photos, documents, or contacts tied to that Google account. Give them time and clear instructions before the managed account replaces it.
Related Settings
- ADMIN-040: Inactive Accounts Blocked or Deleted. Both settings address cleaning up accounts that shouldn’t have active access.
ADMIN-060: Scheduled Release Track Enabled
What This Does
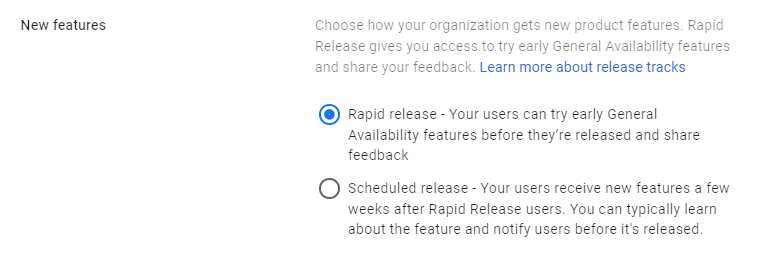
Google Workspace has two release tracks for new features: Rapid Release and Scheduled Release. Rapid Release pushes new features as soon as Google makes them available. Scheduled Release delays new features by one to two weeks, giving admins time to prepare and communicate changes.
Why It Matters
Rapid Release means your users get new features and behavior changes without warning. That’s fine for a tech-savvy team that embraces change. For most businesses, especially regulated ones, surprise changes to how email, Drive, or admin tools work can cause confusion, break workflows, and introduce security settings you haven’t reviewed yet.
Scheduled Release gives you a buffer. When Google announces a change, you have one to two weeks to read the release notes, understand the implications, adjust settings if needed, and tell your team what’s coming.
CISA’s SCuBA baseline recommends Scheduled Release for this reason, and Adelia Risk does too. New features sometimes include new sharing defaults, new app behaviors, or new integrations that may not align with your security policies.
What We Recommend
- Set your release track to Scheduled Release
- Subscribe to Google Workspace Updates (workspaceupdates.googleblog.com) to see what’s coming before it hits your environment
Where to Find It
Admin Console path: Account Settings > Preferences > New Features
📄 Google documentation: Set up release preferences
What Your Team Will Notice
Nothing noticeable. Features will arrive a week or two later than they would on Rapid Release. Most users won’t know the difference because they don’t follow Google’s release calendar.
Common Mistakes
- Leaving the default Rapid Release setting and getting caught off guard. New features sometimes change sharing defaults or enable new integrations. Without the buffer, you’re reacting instead of preparing.
- Setting the scheduled release, but not actually reading the release notes. The buffer only helps if someone is paying attention to what’s coming.
Related Settings
- ADMIN-065: Multi-Party Approval Enabled. Another safeguard against unreviewed changes.
- APPS-030: Additional Non-Core Google Applications Turned OFF. New features may include new apps that need review.
ADMIN-065: Multi-Party Approval Enabled for Sensitive Actions (Enterprise SKU Only)
What This Does
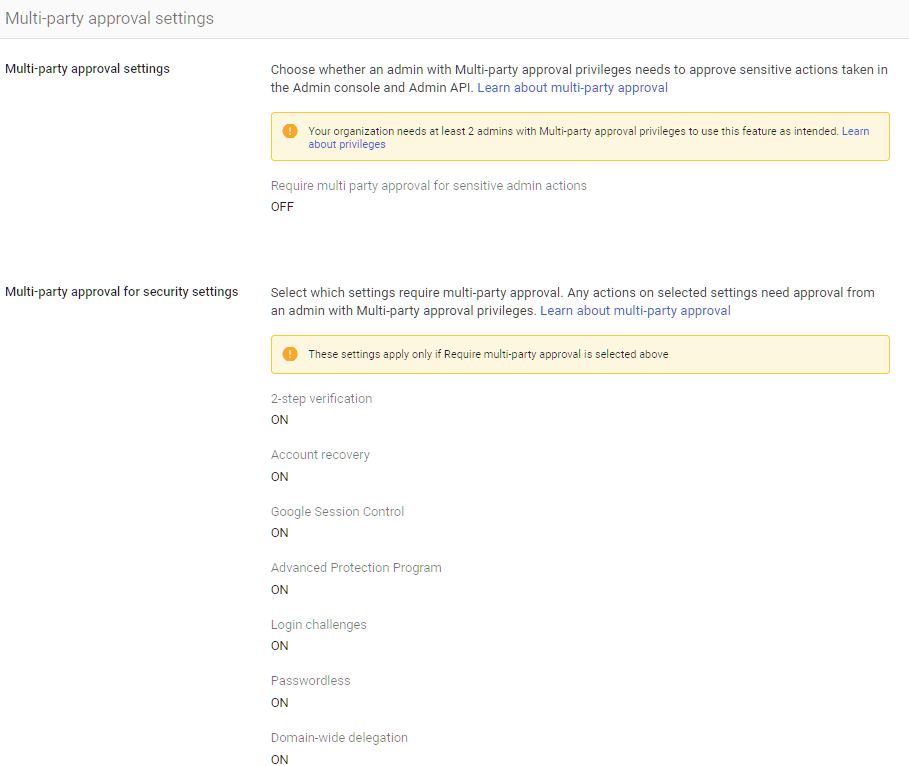
Multi-party approval requires a second admin to approve certain sensitive actions before they take effect. Actions like changing another admin’s account, modifying security settings, or deleting users can require sign-off from two people instead of one.
Why It Matters
A single compromised admin account is dangerous enough. Without multi-party approval, one admin (or one attacker with admin credentials) can make sweeping changes to your environment with no checks. They could add a new super admin account, disable MFA, change recovery settings, or export data.
Multi-party approval puts a second pair of eyes on the most dangerous actions. An attacker who compromises one admin account still can’t make critical changes without a second admin approving the request. This is the same principle behind dual-authorization controls in banking and defense.
CISA’s SCuBA baseline recommends this for all Google Workspace tenants that support it.
What We Recommend
- Enable multi-party approval for sensitive admin actions
- Define which actions require approval (at minimum: changing authentication settings, modifying security rules)
Where to Find It
Admin Console path: Security > Authentication > Multi-party approval settings
📄 Google documentation: Require multiple admin approval for sensitive actions
What Your Team Will Notice
Nothing for regular users. Admins will see a new approval workflow when they try to make certain changes. The second admin will get a notification to approve or deny the request.
Common Mistakes
- Enabling it but only having one person who can approve. If the approver is unavailable, legitimate changes get blocked. Make sure at least two people can approve requests.
- Setting approval requirements on low-risk actions. Too many approval prompts create fatigue. Focus on the actions that would cause the most damage if misused.
Related Settings
- ADMIN-005: 2-4 Global Admins Designated. You need multiple admins for multi-party approval to work.
- ADMIN-070: Access Approvals Configured. Similar concept but for Google support access, not admin actions.
ADMIN-050: Custom Logo Uploaded
What This Does
This checks if your organization has uploaded a custom logo that appears on the Google Workspace login page, in the Admin Console, and in other Google interfaces. When configured, users see your company’s branding instead of the generic Google logo.
Why It Matters
This is a low-risk setting, but it serves a practical security purpose. When users see your company logo on the login page, they can immediately tell the difference between their work Google account and a personal Gmail account. Without a custom logo, the login pages look identical. Users who manage both a personal and work Google account can accidentally enter work credentials on the wrong page, or fail to notice they’re on a phishing page that mimics Google’s generic login.
We see this missed in a surprising number of audits. It takes about two minutes to fix.
What We Recommend
- Upload your company logo to the Admin Console
- Use a logo that’s clearly distinguishable from Google’s default branding
Where to Find It
Admin Console path: Account Settings > Personalization
📄 Google documentation: Add your organization’s logo

What Your Team Will Notice
Users will see the company logo on their Google sign-in page and in certain Google Workspace interfaces. It’s a subtle but helpful visual cue.
Common Mistakes
- Uploading a very small or low-resolution logo. Google has specific size requirements. A blurry logo doesn’t help with visual identification.
- Skipping this because “it’s just cosmetic.” It is mostly cosmetic. But anything that helps users distinguish their work account from a phishing page has security value.
Related Settings
- AUTH-005: Two-Step Verification Enforcement. Branding helps users identify the real login page; MFA protects them if they land on a fake one.
ADMIN-055: Data Region Policy Set
What This Does
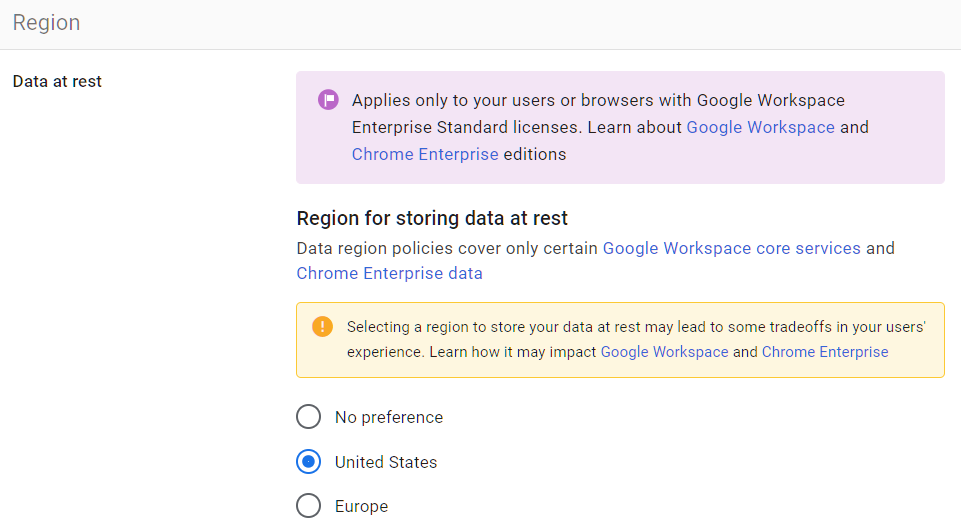
Google Workspace data region policies let you control where your organization’s data is stored at rest: the United States, Europe, or no preference (global). This applies to primary data for core Workspace services like Gmail, Drive, Calendar, and Chat.
Why It Matters
For most small and mid-size businesses, data residency isn’t a pressing security concern. Google encrypts data at rest and in transit regardless of where it’s stored. But for organizations with regulatory requirements around data sovereignty (GDPR for EU data, certain financial regulations, defense contracts), controlling where data lives can be a compliance requirement.
Without a regulatory obligation, choosing a data region still gives you a documented answer to the question “Where is our data stored?” That’s useful for due diligence questionnaires and vendor assessments.
What We Recommend
- Set a data region policy that matches your business requirements
- Choose United States if your business operates in the US and has no EU data obligations
- Choose Europe if you’re subject to GDPR or EU data residency requirements
- Document your choice for compliance purposes
Where to Find It
Admin Console path: Data > Compliance > Data Regions
📄 Google documentation: Choose a geographic location for your data
What Your Team Will Notice
If configured properly, nothing. However, if you choose EU when you’re in the US (or vice versa), you might see slowness.
Common Mistakes
- Assuming data region equals data security. Choosing a region doesn’t make your data more secure. It only determines the physical location of the servers storing it.
- Not documenting the choice. If an auditor or client asks where your data is stored, you need to point to this setting and explain your reasoning.
Related Settings
- ADMIN-080: Assured Controls Configured. Assured Controls provide additional compliance guarantees for data handling.
ADMIN-070: Access Approvals Configured for Google Support Access (Google Workspace Assured Controls or Assured Controls Plus Add-on Only)
What This Does
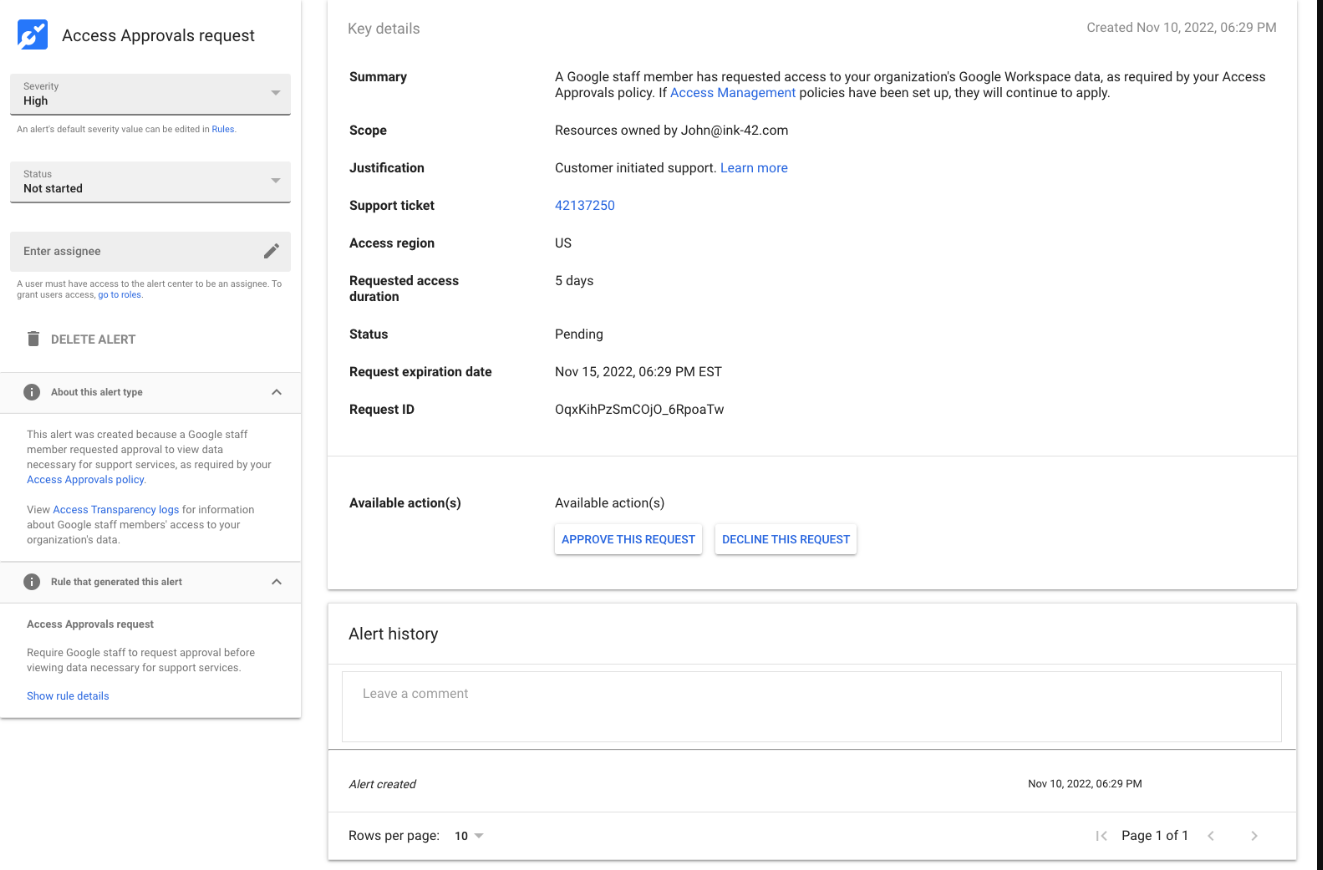
Access Approvals lets you control whether and when Google support staff can access your organization’s data. When a support case requires Google engineers to look at your environment, Access Approvals requires your admin to explicitly approve that access before Google can see anything.
Why It Matters
By default, Google support staff can access your organization’s data when working on a support case, subject to Google’s internal policies. For most businesses, this isn’t a concern because Google has strict internal access controls and auditing. But for organizations in regulated industries or those handling sensitive data, having explicit control over when Google employees can access your environment is a meaningful compliance control.
This is an Enterprise Plus feature. If you have it, configure it. If you don’t have Enterprise Plus, this setting isn’t available to you.
What We Recommend
- Turn on Access Approvals if available on your subscription tier
- Assign at least two approvers so support requests don’t get blocked when someone is out of office
- Review the Access Transparency logs to see historical Google support access (see MON-030)
Where to Find It
Admin Console path: Data > Compliance > Access Approvals
📄 Google documentation: Manage Access Approvals
What Your Team Will Notice
Nothing. This is an admin-only configuration. End users don’t interact with Access Approvals.
Common Mistakes
- Enabling Access Approvals but not monitoring the approval requests. If nobody checks the queue, support cases get delayed because Google is waiting for your approval.
- Having only one approver who goes on vacation. Urgent support cases will stall. Set up at least two approvers.
Related Settings
- MON-030: Access Transparency Logs Reviewed. Shows when Google staff accessed your environment.
- ADMIN-065: Multi-Party Approval Enabled. Similar approval concept for internal admin actions.
ADMIN-075: Client-Side Encryption Reviewed and Configured (Enterprise SKU Only)
What This Does
Client-Side Encryption (CSE) adds an extra layer of encryption on top of Google’s default encryption. With CSE, your organization controls the encryption keys, not Google. That means even Google can’t read the content of encrypted files, emails, or calendar events. CSE is available for Drive, Gmail, Calendar, and Meet on Enterprise Plus and Education Plus plans.
Why It Matters
Google already encrypts all Workspace data at rest and in transit via TLS. CSE goes further by giving your organization sole control of the encryption keys. This matters for organizations that handle highly sensitive data and need to demonstrate that no third party (including Google) can access the content. Think defense contractors, law firms handling privileged communications, and healthcare organizations with sensitive patient records.
For most small businesses, standard Google encryption is sufficient. CSE adds operational complexity (key management, potential loss of some collaboration features) that may not be worth it unless you have a specific regulatory or contractual requirement.
What We Recommend
- Figure out if CSE is needed based on your regulatory and contractual requirements
- If required, work with a key management partner (Google partners with several providers)
- Test CSE with a small group before rolling it out organization-wide
- If not needed, document the decision so future auditors understand why it wasn’t enabled
Where to Find It
Admin Console path: Data > Compliance > Client-side encryption
📄 Google documentation: About client-side encryption
What Your Team Will Notice
Users working with CSE-encrypted files will see a shield icon on those files. Some features may be limited (for example, real-time collaboration on encrypted documents works differently). Users will need to set up their CSE identity.
Sample message to your team:
Hi team,
Starting \[date\], certain files and emails will use an additional level of encryption called Client-Side Encryption. You’ll see a shield icon on encrypted items.
What you need to do:
- Follow the setup instructions sent to your email to configure your CSE identity
- Note that some collaboration features may work slightly differently on encrypted files
This gives our organization full control over encryption keys, which is required for \[compliance reason\]. Setup takes about 10 minutes. If you run into any issues, contact \[IT contact/helpdesk\].
Common Mistakes
- Enabling CSE without a key management strategy. If you lose your encryption keys, you lose access to all CSE-encrypted data. Permanently. Have a key backup strategy in place before you start.
- Turning on CSE for everything when it’s only needed for specific data types. CSE adds friction. Apply it selectively to the data that requires it.
- Assuming CSE replaces other security controls. Encryption protects data at rest. It doesn’t prevent a user from sharing the decrypted version of a file with the wrong person.
Related Settings
- DRIVE-050: Data Loss Prevention Rules. DLP and CSE complement each other: DLP controls what goes out, CSE protects what’s stored.
- ADMIN-080: Assured Controls Configured. Both are enterprise-tier features for organizations with strict compliance requirements.
ADMIN-080: Assured Controls Configured (If Applicable)
What This Does
Assured Controls is a premium compliance feature available with the Assured Controls add-on for Google Workspace Enterprise Plus. It provides additional compliance and data handling controls, including the ability to restrict Google support access to personnel based in specific countries and enforce compliance regimes for specific jurisdictions.
Why It Matters
For most organizations, standard Google Workspace compliance features and data region settings are sufficient. Assured Controls goes beyond that for organizations with strict regulatory requirements around who can access their data and from where. This is relevant for government contractors, defense-adjacent businesses, and organizations handling data subject to ITAR (International Traffic in Arms Regulations) or similar restrictions.
If your organization doesn’t have the Assured Controls add-on, this setting doesn’t apply to you. But it’s worth knowing it exists so you can evaluate whether you need it.
What We Recommend
- If you have Assured Controls, configure it to match your compliance requirements
- If you don’t have it, evaluate whether your regulatory obligations require it
- For defense contractors and CMMC compliance, this is worth serious consideration
- Document your decision either way for audit purposes
Where to Find It
Admin Console path: Account Settings > Assured Controls (only visible if the add-on is active)
📄 Google documentation: About Assured Controls
What Your Team Will Notice
Nothing. Assured Controls are backend compliance configurations. Users don’t interact with them.
Common Mistakes
- Buying the add-on without configuring it. The add-on provides the capability, but you still need to set the specific compliance parameters.
- Assuming Assured Controls replace other security settings. Assured Controls add compliance guarantees on top of your existing security configuration. They don’t substitute for proper admin account security, MFA, or access controls.
Related Settings
- ADMIN-055: Data Region Policy Set. Data region is the baseline; Assured Controls adds more granular compliance.
- ADMIN-075: Client-Side Encryption. Another enterprise-tier compliance control.
- ADMIN-070: Access Approvals. Controls Google support access, which Assured Controls can further restrict.
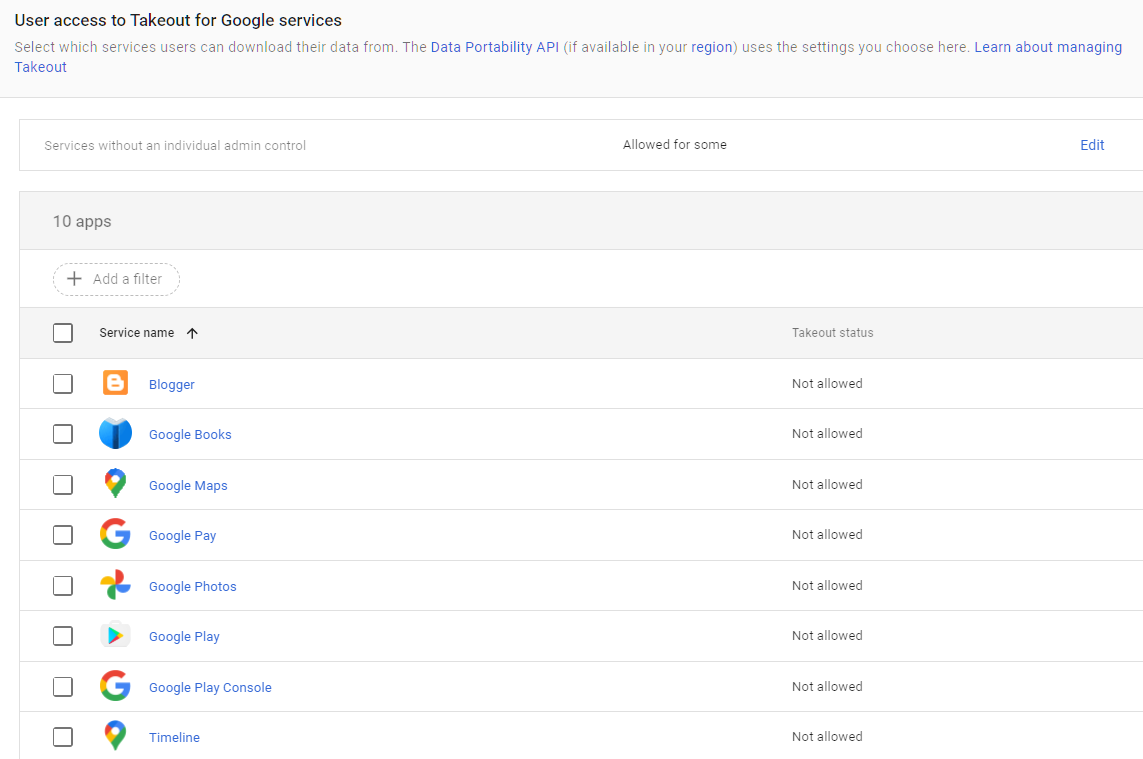
ADMIN-085: Users Prevented from Downloading Data (Takeout)
What This Does
Google Takeout lets users download a copy of all their data from Google services: Drive files, Gmail messages, Calendar data, and more. This setting turns Takeout on or off for your users.
Why It Matters
Takeout is a legitimate tool for personal data portability. But in a business context, it’s a bulk data export feature that can copy your entire Drive contents to a personal device in a few clicks. A departing employee could download every file they have access to (including Shared Drive content) before their last day. An attacker who compromises an account could export everything silently.
This comes up often. Admins don’t realize Takeout exists or that it gives users the ability to bulk-export organizational data. Google Vault for Drive and your DLP rules won’t help if someone sidesteps them entirely by downloading a full data export through Takeout.
Relevant to: SEC, HIPAA, and CMMC all require controls on data exfiltration and bulk downloads.
What We Recommend
- Turn Takeout off for all users, including the “Services without an individual admin control” setting. If someone has a legitimate need for data export (like a departing employee’s personal data), admins can perform the export through the Admin Console or Google Vault.
- If you need to leave Takeout on for specific users, isolate them in a separate OU with monitoring.
Where to Find It
Admin Console path: Data > Data Import & Export > Google Takeout
📄 Google documentation: Allow or block Google Takeout
What Your Team Will Notice
Users who try to access Google Takeout will find the option unavailable. Most users never use Takeout, so this change goes unnoticed in practice.
If you have users who regularly export their data (rare in a business context), they’ll need to request an admin-assisted export instead.
Sample message to your team:
Hi team,
Starting \[date\], the Google Takeout data export feature will be turned off for all accounts. This prevents bulk downloads of organizational data.
What this means:
- You can still download individual files from Drive as usual
- If you need a full data export for any reason, contact \[IT contact/helpdesk\] and we’ll handle it
This is a standard security practice to prevent unauthorized data exports. Day-to-day file access isn’t affected at all.
Common Mistakes
- Not knowing Takeout exists. This is the most common issue. Admins don’t think about it because they never use it themselves. Meanwhile, every user in the org has the ability to export everything.
- Turning Takeout OFF for all services except for the ones without individual controls: If you see the list doesn’t mention Google’s main Core Services like Gmail, Drive, Contacts, etc. This is because these settings are controlled by the setting “Services without an individual admin control,” which needs to be turned OFF as well.
- Turning off Takeout but not monitoring Drive downloads. Even with Takeout off, users can still download files one at a time. Set up alerts for unusual download volumes using MON-010: Email Notification Rules.
- Forgetting to export a departing employee’s data before deleting their account. If you need their files, use Vault or admin data export before removing the account. Takeout being off means they can’t do it themselves.
Related Settings
- DRIVE-005: External Drive Sharing Disabled or Restricted. Controls outbound sharing; Takeout controls outbound export.
- MON-055: Data Retention Configured (Vault). Vault provides admin-controlled data export and retention.
- MON-005: Google Audit Logs Reviewed. Monitor for unusual download activity.
What These Settings Don’t Cover
Google Workspace admin controls are the foundation of your environment’s security, but they’re only one of eight areas in Adelia Risk’s full benchmark. Locking down admin accounts doesn’t help if your Drive is shared with the entire internet or if your email authentication lets spammers impersonate your domain. The complete benchmark covers 97 settings across:
- Authentication (MFA, passwords, passkeys, session controls)
- Gmail Security (email authentication, phishing protections, forwarding controls, encryption)
- Google Drive & Data Sharing (external sharing, shared drive policies, local sync, data loss prevention)
- Calendar, Chat & Meet (meeting security, chat retention, external sharing)
- Third-Party Apps & API (OAuth controls, Marketplace restrictions, API access)
- Device & Mobile Management (MDM, device approval, Chrome policies)
- Monitoring & Compliance (audit logs, alerting, data retention, Advanced Protection)
Each area has its own guide page with the same level of detail.
Need Help Configuring These Settings?
Some of these changes take a few minutes. Uploading a logo, setting your release track, and configuring data regions are quick wins. Others, like separating daily-driver admin accounts, disabling self-recovery, or rolling out client-side encryption, require planning and coordination, sometimes a phased approach.
If you’re in a regulated industry (financial services, healthcare, defense contracting), several of these settings have direct compliance implications. Knowing what to configure is different from knowing what satisfies your regulatory requirements. If you’ve been looking for Google Workspace admin help beyond what Google’s support docs cover, this is what we do.
Adelia Risk provides Google Workspace admin security audits that review all 97 settings, give specific recommendations for your situation, and help you roll out changes without disrupting operations.
Last verified: March 2026
Part of the Adelia Risk Google Workspace Security Benchmark, 97 controls across 8 security areas.